Spring “Tabbouleh” – Bulgur Salad with Lemon, Radishes and Snap Peas

Spring “Tabbouleh” – Bulgur Salad with Lemon, Radishes and Snap Peas

Try this salad on for spring: Bulgur Salad with Lemon, Radishes and Snap Peas is packed with fresh herbs and greens, studded with radishes and sugar snap peas. It’s a refreshing version of tabbouleh, milder in flavor and bursting with seasonal vegetables.

What is tabbouleh? An addictively delicious Middle Eastern salad featuring bulgur wheat, steeped in water or stock, then tossed with an abundance of fresh parsley, mint, lemon and seasoning.  Its name translates to “little spicy” which is probably the tipping point for those of us who can’t get enough of this healthy salad.

As a concept I love playing with variations of tabbouleh. This recipe is inspired by the spring vegetables I purchased at the farmers’ market today. Kale flowers, radishes, sugar snap peas and red spring onions are tumbled with bulgur infused with lemon and olive oil. The spicing is gentle, in deference to the mild sweetness of the vegetables, without ignoring the “little spicy” contingent. Delicious and satisfying, enjoy this as a healthy salad, side dish or light main course.  I served it with pita bread and hummus for an easy vegetarian dinner.

Spring “Tabbouleh” – Bulgur Salad with Lemon, Radishes and Snap Peas

The bulgur should be tender but firm when cooked. The kale flowers are optional yet lovely as a bright garnish. Serves 4.

1 cup bulgur
1 1/4 cups water
Salt
1/4 cup olive oil
Juice and zest of 1 lemon
2 spring onions, thinly sliced
1 small garlic clove, minced
1/4 pound sliced sugar snap peas, cut on the diagonal, about 1 cup
1/4 pound sliced radishes, cut in slivers, about 1 cup
1 cup baby arugula leaves
1/2 cup chopped Italian parsley leaves
1/4 cup chopped mint leaves
1 teaspoon ground cumin
1 teaspoon freshly ground black pepper
1/2 teaspoon cayenne
1/2 cup crumbled feta cheese, or to taste

Combine bulgur, water and 1 teaspoon salt in a medium saucepan. Bring to a boil; remove from heat.  Cover and let sit until the bulgur absorbs all of the liquid, about 20 minutes. Uncover and add 1/4 cup olive oil and lemon juice, fluffing the bulgur with a fork. Cool to room temperature. Add 1 teaspoon salt and all the remaining ingredients, gently tossing to combine. Taste for seasoning. Serve on a bed of greens or in pita pockets.

Farrotto with Shiitake Mushrooms and Beets

You know, I could just call this Farro with Shiitake Mushrooms and Beets, but Farrotto sounds much more fun.  Farrotto?  Yes, if you switch out the rice from risotto with farro, then you end up with farrotto,  a grain steeped in stock – minus the requirement for non-stop stirring. Another difference from rice based risotto, is that farro has a pleasingly chewy texture, never succumbing to mushiness. Each nutty whole wheat grain maintains its shape,  exuding earthy wholesomeness. You can’t help feeling healthy when you eat it.

Farro has an ancient pedigree, originating in the Mediterranean and the Middle East. Also known as emmer, and compared to spelt, farro is a species of wheat, high in fiber and rich in protein and B vitamins. It’s delicious in salads, pilafs, breads, soups and stews. If you haven’t tried it, you should. It’s healthy, economical and delicious.

Farrotto with Shiitake Mushrooms and Yellow Beets

Active Time: about 1 hour
Total Time: about 1 hour
Serves 4

1 tablespoon unsalted butter
2 tablespoons olive oil, divided
1 small shallot, finely chopped, about 2 tablespoons
8 ounces shiitake mushrooms, sliced 1/4-inch thick
Sea salt
1 large garlic clove, minced
1 teaspoon thyme
1 cup semi-pearled farro, rinsed and drained
1/4 cup dry white wine
2 cups chicken stock (or mushroom stock for vegetarian version)
1 medium yellow beet, about 8 ounces, peeled and diced
2 tablespoons chopped Italian parsley, plus extra for garnish
1/2 teaspoon freshly ground black pepper
1/4 cup crumbled fresh goat cheese or feta, optional

1. Melt the butter with 1 tablespoon olive oil in a large saucepan over medium heat. Add the shallot and sauté until softened, about 2 minutes. Add the mushrooms, lightly season with salt, and cook until they begin to soften and release their juices, 3 to 4 minutes, stirring constantly. Add the garlic and thyme and sauté until fragrant, about 30 seconds. Add the farro and cook until slightly toasted, about 2 minutes, stirring constantly. Pour in the wine and stir until absorbed. Add the stock and 1/2 teaspoon salt and bring to a boil. Reduce the heat to low and cover the pot. Simmer until the farro is tender and the liquid has been absorbed, 30 to 40 minutes.
2. While the farro is cooking, heat the oven to 400°F. Toss the beets, 1 tablespoon oil, and 1/4 teaspoon salt in a bowl. Spread on a small rimmed baking sheet or in a baking pan and roast in the oven until the beets are tender and golden brown in spots, about 20 minutes.
3. When the farro is ready, stir in the beets, parsley, and black pepper. Serve garnished with additional parsley and crumbled fresh goat cheese, if using.

Roasted Yellow Beet and Ricotta Tian

I find it impossible to resist beets. Their colors are magnificent – it’s a miracle that nature can provide something edible that is so vibrantly hued. With the vivid color, of course, comes nutrients. Beets are a nutritional powerhouse, rich in antioxidants, vitamins, and beta-carotene. I purchased these beets at the farmers’ market, without knowing how I would prepare them. I was happy to simply look at them.

Prompted by a batch of fluffy ricotta in my fridge, I decided to layer the yellow beets with the cheese as a riff on lasagna, with the beet slices replacing the lasagna sheets. Yellow beets are milder in flavor than red beets, and their nutty, buttery flavor wouldn’t overpower the cheese. I also feared the red beets would completely saturate the dish with their magenta color, which, while lovely to look at, threatened to irrevocably tint my pristine ricotta. This is a visually motivated dish.

Roasted Yellow Beet and Ricotta Tian

Active Time: 20 minutes
Total Time: 1 hour and 10 minutes
Serves 4; Makes one (8-inch) tian or 4 individual ramekins

1 pound yellow beets (about 4 medium)
12 ounces whole milk fresh ricotta, drained of excess liquid
2 tablespoons finely grated Parmesan cheese, plus extra for sprinkling
2 tablespoons finely chopped fresh basil, plus extra for garnish
1 small garlic clove, minced
1 teaspoon finely grated lemon zest
1 teaspoon salt
1/2 teaspoon freshly ground black pepper
Extra-virgin olive oil

  1. Preheat the oven to 350°F.
  2. Trim the greens and ends of the beets and peel the skin. Thinly slice the beets, preferably with a mandoline, about 1/8-inch thick.
  3. Combine the ricotta, Parmesan, basil, garlic, lemon zest, salt, and the black pepper in a bowl and whisk to blend.
  4. Arrange the beets in one layer, slightly overlapping, in an 8-inch diameter gratin dish (or 4 individual ramekins). Lightly brush the beets with olive oil. Smear a layer of the ricotta over the beets. Repeat the layering process, finishing with a thin layer of ricotta on the top (some of the beets should be showing). There should be about 4 layers. Sprinkle 1 to 2 teaspoons Parmesan cheese over the tian.
  5. Transfer to the oven and cook until the beets are tender when pierced with a knife, about 50 minutes. If the top begins to brown before the beets are fully cooked, loosely cover with foil. Remove from the oven and let stand at least 15 minutes before serving.
  6. Serve warm or at room temperature garnished with fresh chopped basil.

Cauliflower au Gratin

Cauliflower au Gratin

Who can’t resist a Cauliflower Gratin? Perfect as a side dish or vegetarian course, these golden gratins are bubbling with cheesy goodness. I found yellow cauliflower at the market and mixed it with white cauliflower in this recipe. Don’t just experiment with color. Get creative with other veggies, such as  broccoli florets, chunks of celeriac or diced rutabaga for variety and flavor. So long as there’s lots of gratinéed cheese and bechamel, this gratin is a winner.

Cauliflower Gratin
Serves 4

1 large head of cauliflower, broken into florets
3 tablespoons unsalted butter
3 tablespoons flour
2 cups whole milk
1 teaspoon salt
1 teaspoon ground mustard
1/2 teaspoon freshly ground black pepper
1/4 teaspoon ground nutmeg
4 ounces Gruyere cheese, finely grated
2 tablespoons finely grated Parmesan cheese
2 tablespoons panko breadcrumbs, lightly toasted

Preheat oven to 375 F. (190 C.)  Butter a gratin dish or 4 individual ramekins.
Steam cauliflower until crisp tender. Transfer to a large bowl. Melt butter in a small saucepan over medium heat. Whisk in flour, and cook, stirring, 2 minutes. Add milk in a steady stream, whisking constantly. Cook, stirring, until bechamel thickens. Whisk in salt, mustard, pepper and nutmeg. Add half of the Gruyere cheese, whisking until smooth. Pour the bechamel over the cauliflower. Toss to thoroughly coat. Pour into the gratin dish. Combine remaining Gruyere cheese, Parmesan and panko in a small bowl. Sprinkle over the top of the gratin. Bake until golden on top and bubbling, about 30 minutes.

Golden Onion Tart with Gruyère and Thyme

Golden Onion Tart with Gruyère and Thyme

This tart is a vehicle for caramelized onions. It’s also inspired by an appetizer I ate years ago in a Swiss auberge overlooking the Lake of Geneva. It’s been so long, I can’t remember the name of the restaurant, but I do remember the onion tart. It was simple and rustic, just like the half-timbered dining room with its roaring open fire where we tasted it. Sweet, rich and minimal, this tart was perfection in its simplicity. Today I make a version of this memory while we enjoy another view from our California home. I like to serve it in small slivers with glass of wine before dinner.

Golden Onion Tart with Gruyère and Thyme
Serves 8 to 12

For the dough – adapted from a recipe by Alice Waters:
1 cup all-purpose flour
1/2 teaspoon salt
6 tablespoons unsalted butter, chilled, cut in 1/4 inch cubes
3 tablespoons ice water

Stir flour and salt together with a fork. Toss in butter. Work the butter into the flour with a fork or your fingertips until it resembles coarse meal, with some pieces of the butter apparent. Sprinkle in the water while stirring with a fork until the dough comes together, adding another tablespoon of water if necessary. Form into a ball and flatten. Wrap in plastic wrap and refrigerate 1 hour

For the filling:
2 tablespoons olive oil
2 pounds yellow onion, peeled and thinly sliced
1 teaspoon salt
2 tablespoons port wine
1 teaspoon freshly ground black pepper
2 ounces finely grated Gruyère cheese
1 teaspoon fresh thyme, plus extra for garnish
1 egg, slightly beaten

Heat olive oil over medium heat in a deep skillet or pot. Add onions and salt. Cook onions, stirring occasionally, until they are golden brown, soft and squidgy, about 30 minutes. Add port wine and cook, stirring, 2 minutes. Remove onions from heat and stir in the pepper. Cool slightly.
While the onions are cooling, roll out the dough to fit in the bottom and up the side of a 10 inch round tart tin. Sprinkle half of the cheese over the bottom of the tart. Spoon onions into the shell and spread evenly. Sprinkle 1 teaspoon thyme over the onions. Brush the exposed crust rim with the egg wash. Sprinkle the tart and crust with the remaining cheese.
Bake in a preheated 375 F. oven until the crust is firm and golden and the onions have turned a rich golden brown, without blackening, about 30 minutes. Remove and cool slightly. Serve slightly warm or at room temperature garnished with thyme sprigs.

Spiced Carrot Croquettes with Yogurt-Sriracha Sauce

If this recipe sounds vaguely familiar to you, then it might be because these croquettes have a similar method to my favorite Smoked Salmon Fish Cakes.  Say, what? – you may ask.  It’s true – this is a great example of a recipe that works. Over many renditions I finally arrived at a pan-fried cake/patty/croquette recipe which I love. It’s light, crispy and packed with the main ingredient. It’s a winner, and I’m sticking to it.

In this version, the star ingredient is carrot. Its sweetness is nicely balanced by the spice and heat of chile, coriander and cumin. Flecked with green onion and cilantro, the croquettes are light and airy with a satisfying bite. A coating of panko crumbs ensures a crisp exterior, begging for a dip in the sriracha laced yogurt sauce, which is a perfect cooling foil to the warm croquettes.

Spiced Carrot Croquettes with Yogurt Sriracha Sauce
Makes 16 – 1 1/2 inch croquettes

Carrot croquettes:
8 large carrots, peeled, sliced 1/4 inch thick
1 3/4 cup Panko bread crumbs, divided
2 green onions, ends trimmed, white and green parts minced
1 small red jalapeno or serrano chile pepper, stemmed and seeded, minced
2 tablespoons chopped cilantro
1 teaspoon ground coriander
1 teaspoon ground cumin
1 teaspoon salt
1/2 teaspoon freshly ground black pepper
2 tablespoons Greek-style whole milk yogurt
1 tablespoon freshly squeezed lemon juice
Vegetable oil for frying

Yogurt-Sriracha Sauce:
1 cup Greek-style whole milk yogurt
1/2 tablespoon sriracha sauce
2 teaspoons freshly squeezed lemon juice
Pinch of salt, to taste

Steam carrots until very soft, 30-40 minutes. Transfer to a bowl and mash. (There should be about 2 cups.)
Place 1 1/2 cups breadcrumbs in a shallow bowl; set aside. Add 1/4 cup breadcrumbs, green onion, chile pepper, cilantro, coriander, cumin, salt and pepper to the carrots. Stir to combine, and then stir in the yogurt and lemon juice. Using a soup spoon, scoop out a spoonful of the carrots. Lightly form into a 1 1/2 inch patty. Gently roll in reserved breadcrumbs to coat. Place on a platter. Repeat with remaining carrots. (Croquettes may be prepared to this point up to 3 hours before cooking. Loosely cover with plastic and refrigerate.)
Heat 2 tablespoons vegetable oil in a skillet over medium-high heat. Add croquettes in batches. Fry until golden brown, turning once, about 3 minutes per side. Transfer to a plate lined with a paper towel. Repeat with remaining carrots.
To make the sauce, whisk all of the ingredients in a small bowl. Transfer croquettes to a serving plate. Serve with the yogurt sauce and lemon wedges. Garnish with cilantro sprigs.

Kale Slaw

Kale Slaw

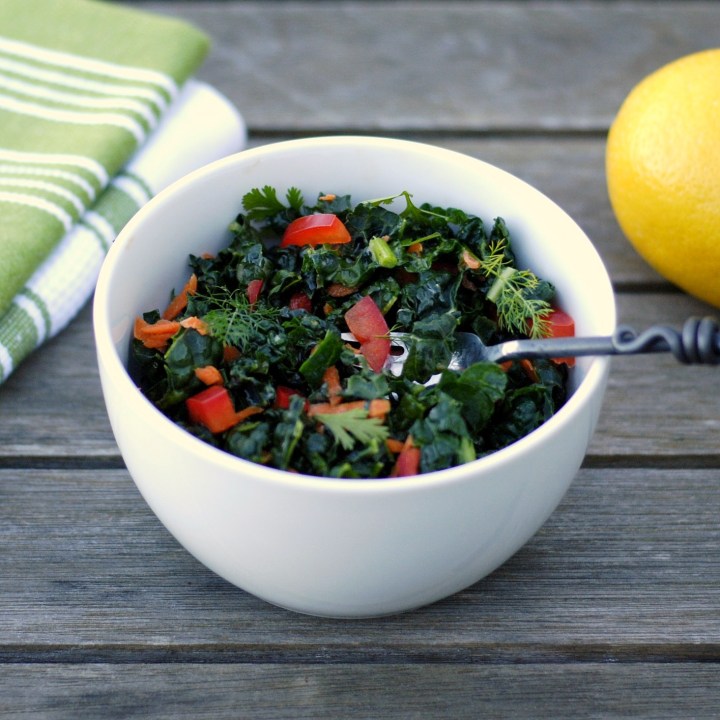
Yep, that’s kale slaw – not cole slaw. The star of this little bowl of goodness is healthy, nutrient-rich kale. Not only is kale considered a “superfood” it’s delicious and versatile to use. Try it raw in salads, braised with garlic and olive oil, blanched in soups, or crisp-roasted in the oven. Whichever method you choose, kale is a keeper. In this version of a slaw, sturdy lacinato kale replaces the usual cabbage. Accompanied by carrot shavings, sweet red pepper and chile, the kale is tossed with a cumin-infused Dijon vinaigrette. This a satisfying side dish which tastes great and looks pretty, too.

Kale Slaw
Makes 4 servings

I like the flavor of lacinato kale, an heirloom kale variety from Tuscany. It’s dark blue-green leaves retain their firmness in this slaw recipe. Feel free to substitute or combine other kinds of kale for a variety of color and texture.

2 tablespoons freshly squeezed lemon juice
1 teaspoon Dijon-style mustard
1/2 teaspoon ground cumin
1/2 teaspoon salt
1/2 teaspoon freshly ground black pepper
1/3 cup extra-virgin olive oil
1 bunch lacinato or Tuscan kale, tough ribs removed, leaves thinly sliced
1 large carrot, grated
1 small red bell pepper, stemmed, seeded, membranes removed, cut in 1/2 inch slivers
1-2 red fresno or serrano peppers, stemmed, seeded, membranes removed, minced
2 scallions, white and green parts thinly sliced
1/4 cup chopped fresh dill sprigs
1/4 cup cilantro or Italian parsley leaves

Combine lemon juice, mustard, cumin, salt and pepper in a small bowl. Slowly whisk in oil in a steady stream to emulsify. Set aside.
Combine remaining ingredients in a large bowl. Drizzle half of the vinaigrette over the salad and toss to thoroughly coat. Add additional vinaigrette to taste. Cover and refrigerate at least one hour and up to 4 hours. Serve with additional dill, cilantro or parsley sprigs as garnish.

Root Vegetable Gratin

Root Vegetable Gratin

If you are searching for holiday side dishes, this root veggie gratin is a fresh alternative to a traditional potato gratin. Layers of rutabaga and sweet potato alternate with red potatoes in this colorfully striated dish flecked with sage.  The root vegetables lend an extra dimension to this rustic winter gratin with their sweet earthy flavor, while adding a more nutritious alternative to the simple potato.

Root Vegetable Gratin
Serves 6-8

16 ounces sour cream
1 garlic clove, minced
1 tablespoon minced fresh sage leaves
1 teaspoon salt
1 teaspoon freshly ground black pepper
1/2 teaspoon ground nutmeg
4 medium red potatoes
2 large sweet potatoes, peeled
1 large rutabaga, peeled
6 ounces Gruyère cheese, finely grated

Preheat oven to 375 F. (190 C.) Butter a gratin dish.
Combine sour cream, garlic, sage, salt, pepper and nutmeg in a bowl and mix well. Thinly slice potatoes and rutabaga, preferably with a mandoline. Arrange 2 layers of red potatoes, overlapping, in bottom of gratin dish. Spread a thin layer of the sour cream over the potatoes. Sprinkle with a little Gruyere cheese. Cover with a double layer of sweet potatoes. Spread with a thin layer of sour cream and a sprinkling of Gruyere. Repeat with a layer of rutabaga. Repeat process until all of the vegetables have been incorporated. (There should be about 6 layers in all.) Thoroughly top gratin with remaining sour cream. Sprinkle a liberal amount of Gruyère over sour cream. Bake in oven until vegetables are tender and top of gratin is brown and bubbling, about 1 hour and 15 minutes. (Loosely cover gratin with buttered foil if browning too fast.) Serve garnished with fresh sage leaves.

Tequila-Spiked Cranberry, Apple and Jalapeño Relish

Tequila-Spiked Cranberry, Apple and Jalapeño Relish

This is not your ordinary cranberry sauce. Spiked with tequila and boosted with jalapeño, this relish is bright and spicy, promising a nice kick at the holiday table. Be sure to keep the recipe on hand, post-festivities. Tequila-Spiked Cranberry, Apple and Jalapeño Relish is also a fresh and zesty accompaniment to roast pork and chicken.

Tequila-Spiked Cranberry, Apple and Jalapeño Relish
Makes 2 cups

12 ounces fresh cranberries, washed and picked over
3/4 cup light brown sugar
1/4 cup freshly squeezed orange juice
1/4 cup apple cider vinegar
1 teaspoon mustard seeds
1/2 teaspoon cinnamon
1 Granny Smith apple, cored, peeled, cut in 1/4″ dice
1 jalapeño pepper, stemmed, seeded, finely diced
2 tablespoons tequila
1 tablespoon freshly squeezed lime juice
1/2 teaspoon salt
1/2 teaspoon freshly ground black pepper

Combine cranberries, sugar, orange juice, vinegar and mustard seeds in a medium saucepan.  Bring to a boil, then simmer, occasionally stirring, until cranberries pop and sauce thickens, about 15 minutes.  Stir in remaining ingredients and simmer one minute.  Remove from heat and cool.  Refrigerate, covered,  at least 2 hours or overnight to let flavors develop.

Thanksgiving Side: Spiced Acorn Squash with Coriander and Lime

Thanksgiving Side: Spiced Acorn Squash with Coriander and Lime

Spiced Acorn Squash with Coriander and Lime

Have you noticed that fall and winter vegetables are often rock-hard?  It’s as though Mother Nature is providing a protective shield for her bounty to hunker down for the colder weather.  Unlike the squishy, juiciness of summer berries and tomatoes, autumn’s pumpkins and squash can double as paperweights and door stops. Drop a butternut squash on your foot, and you might break a toe.

Yet appearances can be deceiving. Cook a winter squash and before your eyes it will undergo a culinary transformation.  Its ugly-frog exterior, all bulbous, mottled and flecked, morphs and softens with roasting, exposing its inner sweetness.  And with some squash, such as acorn and delicata, what was once an impermeable skin becomes edible, complimenting its buttery, vividly colored interior flesh.  No sloucher in the nutrient department either, winter squash and pumpkins, are treasure troves packed with iron, potassium, Vitamin A, and rich sources of beta-carotene.

So go ahead and continue to use these rock-hard seasonal sculptures as table decorations or bowling balls.  But, I promise you, if you cook them they will transform into the Prince Charming of winter vegetables.

Spiced Acorn Squash with Coriander and Lime

The spice and citrus add brightness to the buttery squash. Do not even think of peeling the skin. Acorn squash skin is edible once cooked, adding texture and nuttiness to the flavors of the dish. Serves 4 as a side.

2 small or one large acorn squash, stem ends removed, halved and seeded
2 tablespoons extra-virgin olive oil
1 teaspoon sugar
1 teaspoon paprika
1 teaspoon ground cumin
1/2 teaspoon ground coriander
1 teaspoon salt
1/2 teaspoon freshly ground black pepper

1 red serrano chile pepper, stemmed, seeded, ribs removed, finely chopped
Juice of one lime, about 2 tablespoons
2-3 tablespoons chopped fresh coriander/cilantro leaves

Prepare:
Pre-heat oven to 425 F. (200 C.)
Cut squash in 3/4″ wedges.  Toss squash with oil, sugar, paprika, cumin, salt and pepper in a large bowl until squash is evenly coated with spices.  Arrange squash in one layer on baking tray, flesh-side down.  Roast in oven until tender and golden, about 45 minutes.  Remove and cool slightly.  Transfer to large bowl and toss with chile pepper, lime juice and cilantro leaves.  Serve warm or at room temperature.