Lasagna with Kale

Layer it on with this cheesy-rich lasagna:

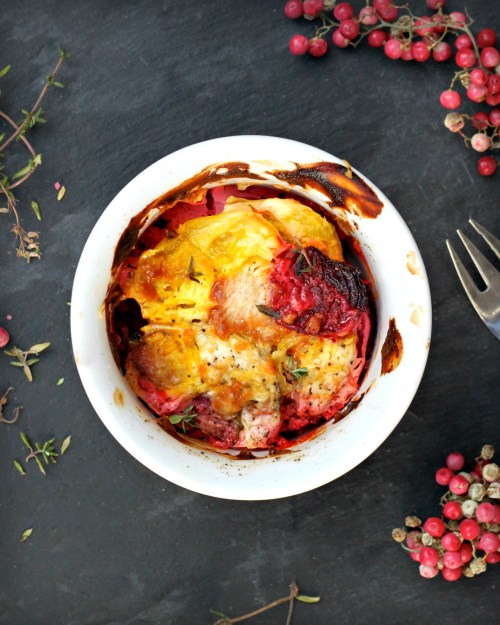
Behold the lasagna. The cooler season begs for layers – and not just when it comes to clothing. This hefty casserole is stacked and loaded with three cheeses, a meaty tomato sauce, and – wait for it – kale. Now before you roll your eyes, realize this: the lasagna can handle it. In fact, it will put the kale leaves in their place, allowing them to shine without overtaking this admittedly non-vegetarian recipe with excessive leafiness. It will invite a layer of freshness into an otherwise robust, gooey, and dense lasagna. And if you are trying to sneak a few vegetables into someone’s diet – this may do the trick.

With that preface, let me add that this recipe can easily be made vegetarian by simply omitting the meat from the tomato sauce. The choice is yours, and both versions are delicious. I’ve provided a meat sauce in the recipe, but you can simply omit it, if you prefer. And if you have a favorite prepared sauce that you swear by, then by all means, make your life a little easier and use it.

Now, back to the layers. Layer your lasagna as high as your dish will allow. And do try including kale leaves in the mix. They will soften and melt into the lasagna, tempered by the rich cheese and bright sauce, while providing layers of freshness, color, and, of course, extra nutrients. You might even have room for seconds.

 (Note: a double recipe is photographed)

Lasagna with Kale

Active Time: 45 minutes
Total Time: 1 hour and 45 minutes
Makes one 9-inch square lasagna. For a larger rectangular lasagna (pictured), double the ingredients. 

Sauce:
1 tablespoon olive oil
1/2 pound ground beef
1 small yellow onion, finely chopped
2 garlic cloves, minced
1/4 teaspoon crushed red pepper
1 (28-ounce) crushed Italian plum tomatoes
2 tablespoons tomato paste
1 teaspoon dried oregano
1/2 teaspoon sugar
Salt and freshly ground black pepper to taste

Ricotta:
16 ounces whole milk ricotta
1 large egg, lightly beaten
1/4 cup finely grated Parmesan
2 tablespoons half and half
1 garlic clove, minced
1/2 teaspoon salt
1/4 teaspoon freshly ground black pepper

1 box lasagna sheets 
One bunch Tuscan (Lacinato) kale leaves, ribs removed, torn into large pieces
8 ounces fresh  mozzarella, shredded
1 cup finely grated Parmesan and/or Pecorino Romano cheese

1. Make the sauce: Heat the oil in a medium saucepan over medium heat. Add the beef (if using) and cook until lightly browned, 5 to 7 minutes, stirring as needed. Add the onion and cook until softened, about 3 minutes, stirring often. Add the garlic and crushed red pepper and cook until fragrant, about 1 minute. Stir in the remaining sauce ingredients and simmer uncovered, for 25 minutes, stirring occasionally.
2. Whisk the ricotta ingredients in a bowl until smooth.
3. Heat the oven to 375°F.
4. Spoon a thin layer of sauce in bottom of a baking dish. Place a layer of lasagna sheets over the sauce, breaking them to fit to size as necessary. Smear some of the ricotta over the lasagna sheets.  Arrange the kale leaves over the ricotta and drizzle some of the sauce over the kale. Scatter the mozzarella over the kale and sprinkle with grated cheese. Repeat the layering process, gently pressing down on the layers as you stack the lasagna. (You may not use up all of lasagna sheets).
5. Cover the dish with foil, transfer to the oven, and bake for 40 minutes. Remove the foil and continue to bake until the lasagna is sheets are tender when pierced with a knife, the cheese is bubbling, and the top is golden brown, 15 to 20 minutes. Let stand 10 minutes before cutting and serving.

Mashed Root Vegetables – A Colorful and Healthy Alternative to Mashed Potatoes

These Roots are Smashing

Mashed Root Vegetables

Root vegetables are fall and winter’s best-kept secret. Packed with nutrients, natural sugars and starch, the humble root is a healthy and flavorful substitute for the ubiquitous russet potato, and a superb way to get your vitamins and nutrients in the cold weather season. A good peel of skin reveals a rainbow of antioxidant-rich colors ranging from magenta to ochre to buttery yellow, sure to brighten any gray day – and your holiday table.

Feel free to mix and match roots, such as sweet potato, parsnip, rutabaga, carrot, celery root, and of course the dependable russet, to your taste and preference. Try to choose a balance of sweet and savory roots for even flavor and mash them to your desired consistency. It’s ok if the mash is a little chunky – it provides a pleasant texture. This recipe calls for a combination of sour cream and Greek yogurt in the mash, which creates a balance of smooth richness and tangy lightness. So long as you use a combined amount of one cup, you can opt for all of one or the other.

Mashed Root Vegetables

Active Time: 40 minutes
Total Time: 40 minutes
Serves: 4 to 6

3 pounds mixed roots (such as 1 pound each of sweet potato, celery root, and rutabaga)
Salt
3 garlic cloves, minced
2 tablespoons unsalted butter, softened
1/2 cup sour cream
1/2 cup whole milk Greek yogurt
Freshly ground black pepper

1. Peel the root vegetables and cut into 1-inch chunks. Place the vegetables in a large pot with 2 teaspoons salt and cover with cold water. Bring to a boil over high heat, then reduce the heat to medium and simmer until the vegetables are very tender, about 20 minutes.
2. Drain the vegetables and return them to the pot; cool 5 minutes. Add the garlic and butter and mash with a potato masher until the butter is melted. Add the sour cream and yogurt and continue to mash until the ingredients are blended and the mash is to your desired consistency (I like mine a little chunky). Add 1 teaspoon salt and 1/2 teaspoon black pepper, taste for seasoning, and add more if desired.
3. Spoon into a serving bowl and serve warm.

Prepare ahead:
The mash may be prepared up to 1 day in advance of serving. Cool completely and transfer to a buttered gratin dish. Cover and refrigerate for up to 24 hours. Remove from refrigerator 1 hour before serving.
To reheat, heat the oven to 325°F. Dot the top of the mash with about 1 tablespoon of finely diced butter and cover with foil. Bake in the oven until heated through, 30 to 40 minutes.

Paella on the Grill – Recipe and Tips

Fire up the Paella Pan (and the Grill) for Father’s Day

Father's Day Paella - on the Grill

Father’s Day is around the corner, so get ready to fire up the grill and break out the big guns – or in this case, the big paella pan. Paella is always fun to make and of course, to eat. It’s a perfect way to feed a crowd and your family, and the best way to make it is over a fire. When it’s ready to serve, simply plunk it down in the center of the table and let everyone dig in. Family-style eating doesn’t get better than this, which is a perfect way to celebrate Dad.

Myriad versions of paella exist, depending on region and taste, but there are specific ingredients to use and techniques to follow for authentic results.

The pan:
Think wide, low, and flat. The key is to spread the rice in a thin layer, so that as many grains as possible are in contact with the bottom of the pan. This will ensure not only contact with the aromatics (soffrito) but the desired crispy bottom (socarrat) of the cooked paella. Paella pans are easy to find and affordable. I purchased my 15-inch pan for less than $30. Alternatively, a very large cast iron skillet will do the trick.

Rice:
Short grain rice will absorb the liquid, remain relatively firm during cooking, and crisp – long grain rice will not. Use short grain rice, preferably Spanish Bomba or Valencia. Risotto (Arborio) rice may be substituted, if necessary. Note: Depending on the rice, cooking times may vary slightly.

Soffrito:
An important blend of sautéed aromatics, typically onion, garlic, and grated ripe tomato, is used as a base to flavor the rice. It’s important to sauté the ingredients until the moisture from the tomato and the wine evaporate and the soffrito thickens, and let it deepen in color to build flavor.

Stock:
If possible, use a homemade stock, chicken or shrimp stock are ideal, although a good quality store-bought chicken stock is a fine substitution. A key step is to add a generous pinch of saffron to the stock to infuse a subtle perfume and a burnished golden-red color.

Socarrat:
This is the holy grail of paella, the coveted crispy bottom that forms in the pan while the paella is cooking. To achieve this, a few techniques are imperative. Do not overload the pan, or the rice will not be able to dry out and will not crisp. And, most importantly, do not stir the paella once the rice is spread in the pan and topped with the proteins. You will know if the rice is crisping when the paella begins to make crackling sounds. This is the sure-fire way to know when the paella is ready, so be sure to wait for the “snap-crackle-pop” before you remove the pan from the grill!

Grill it!
It’s important for the pan to cook over an even heat source. A grill can accommodate the size of a large paella pan, unlike many stovetops. Plus, the fire will add a smoky backdrop to the dish. And finally, Father’s Day really wouldn’t be replete without turning on the grill, right?


Grilled Paella

Active Time: 1 hour
Total Time: 1 hour, plus standing time
Serves: 6

4 plum (Roma) tomatoes, halved lengthwise
4 cups chicken stock
1/2 teaspoon saffron threads
1 pound boneless chicken thighs, cut into 1-inch pieces
Smoked sweet Spanish paprika
Salt
Freshly ground black pepper
1 pound large (16/18) shrimp, shelled and deveined, tails intact
Extra-virgin olive oil
8 ounces Spanish chorizo, cut crosswise into 1/2 inch slices

1 medium yellow onion, chopped, about 1 cup
3 garlic cloves, minced
1/4 cup dry white wine

2 cups paella rice (Bomba or Valencia), rinsed

12 to 16 mussels, scrubbed and beards removed
1/4 cup chopped Italian parsley
Lemon wedges for serving

1. Grate the tomatoes, cut-side down, on a box grater. Discard the skins and transfer the pulp and juices to a small bowl.

2. Bring the stock to a simmer in a medium saucepan over medium heat. Add the saffron and keep warm over low heat.

3. Place the chicken in a bowl and toss with 1 teaspoon paprika, and then lightly season with salt and black pepper. Put the shrimp in a separate bowl and toss with 1/2 teaspoon paprika, and then lightly season with salt and black pepper.

4. Prepare the grill for direct cooking over medium heat. Preheat a 15-inch paella pan or large cast iron skillet for about 10 minutes.

5. Add 1 tablespoon oil to the paella pan. Add the chorizo and cook until the chorizo is golden brown on both sides, 3 to 4 minutes, turning as needed. With a slotted spoon, transfer the sausage to a bowl. There should be rendered fat from the chorizo remaining in the pan. If not, add 1 tablespoon oil to the pan. Arrange the chicken in one layer in the paella pan and cook until colored on both sides, 4 to 6 minutes, turning as needed. With a slotted spoon, transfer the chicken to the bowl with the chorizo. (The chicken will not be cooked all the way through at this point.)

6. If the pan is dry, add 1 tablespoon oil to the pan. Add the onion and sauté until softened, 2 to 3 minutes. Add the garlic and 1 tablespoon paprika and sauté until fragrant, about 30 seconds. Add the grated tomatoes with juices and the wine, stir to combine, and simmer, with the lid closed, until the liquid evaporates and the mixture thickens and darkens slightly, about 3 minutes, stirring occasionally. Add the rice and 1 teaspoon salt and stir to coat. Pour in the broth, stir to blend, and smooth the rice in an even layer in the pan. (Do not stir the rice after this point!) Arrange the chicken and chorizo over the rice and drizzle any accumulated juices from the bowls over the rice.

7. Cook the paella, with the lid closed, until about 3/4 of the liquid is absorbed and the rice is exposed, turning the pan occasionally to ensure even cooking, about 15 minutes.

8. Nestle the shrimp and mussels (hinge-side down) into the rice and continue to cook, with the lid closed, until the shrimp are cooked through, the mussels have opened, and the rice is making a crackling sound, 10 to 12 more minutes, turning the pan occasionally to ensure even cooking.

9. Remove the paella pan from the grill and discard any unopened mussels. Let stand for 5 minutes. Sprinkle the parsley over the paella and garnish with lemon wedges. Serve immediately.

Roasted Baby Beet Gratin

Roasted Beet Gratin

This recipe is one of my favorite ways to eat beets, especially in the winter when rich gratins are warm and satisfying. It’s also a great way to introduce the beetroot to any skeptical family member. Small or baby beets are mild and sweet, and their flavor is less assertive than their grown-up relatives. In this recipe, they are thinly sliced and smothered in layers of garlic-infused sour cream flecked with orange zest and a generous shower of nutty Gruyère cheese. All of the ingredients meld together, and while the beets are present, they are not overwhelming in flavor. As they cook, the beets release their juices and saturate the dish with spectacular color, which makes this one of the prettiest gratins I have seen. So give it a try, and let the skeptics eat with their eyes – and also hopefully with a fork.

Roasted Baby Beet Gratin

Active Time: 30 minutes
Total Time: 1 hour and 30 minutes
Makes one (8 by 8-inch) gratin or 6 to 8 (4-ounce) ramekins

2 cups (16 ounces) sour cream
1 garlic clove, minced
1 teaspoon finely grated orange zest
Salt
Freshly ground black pepper
Unsalted butter
16 baby beets, about 2 pounds trimmed, scrubbed clean
4 ounces finely grated Gruyere cheese
Finely chopped thyme leaves

1. Preheat the oven to 375°F. Butter an 8 by 8-inch square gratin dish (or individual ramekins). Whisk the sour cream, garlic, orange zest, 1/2 teaspoon salt, and 1/2 teaspoon black pepper in a bowl.
2. Thinly slice the beets with a mandolin or knife.
3. Arrange 1/3 of the beets, slightly overlapping in the baking dish. Spoon 1/3 of the sour cream over the beets, carefully spreading to cover. Sprinkle 1/3 of the cheese over the top. Lightly season with salt, pepper, and a pinch of thyme. Repeat with two more layers.
4. Transfer the gratin to the oven and bake until the beets are tender and the gratin is bubbly and golden, about 50 minutes. Let stand 5 to 10 minutes before serving. Serve warm.

Baby Beet Gratin

Beet Gratin TasteFood

I can’t promise that any of your beet-averting family members will do a complete 180º turn on their opinion when it comes to these earthy roots. I will suggest that this casserole might be your best chance to convert them. Baby beets are mild and sweet, and their flavor is less assertive than their grown-up relatives. In this recipe, they are thinly sliced and smothered in layers of orange and garlic-infused sour cream and a generous shower of nutty Gruyère cheese. All of the flavors meld together, and while the beets are present, they are not overwhelming in flavor. As the beets cook, they release their juices and saturate the dish with spectacular color, which makes this one of the prettiest gratins I have seen. So give it a try, and let the skeptics eat with their eyes – and also hopefully with a fork.

Baby Beet Gratin with Orange and Thyme

I prepared this recipe with a variety of red, golden and chioggia beets. So long as you scrub them well, you don’t need to peel them (and their skin is a great source of nutrients). This recipe has you assemble the gratin in a casserole dish. You can also divide it between smaller ramekins or cast iron vessels, such as 2 (6-inch) cast iron skillets (pictured above).

Makes 1 (7 by 9-inch) gratin

16 ounces whole milk sour cream
1 garlic clove, minced
1 teaspoon finely grated orange zest
Salt
Freshly ground black pepper
Unsalted butter
16 baby beets, about 2 pounds trimmed, scrubbed clean
4 ounces finely grated Gruyere cheese
Finely chopped thyme leaves

1. Preheat the oven to 375°F (190°C). Butter a 7 by 9-inch square gratin dish. Whisk the sour cream, garlic, orange zest, 1/2 teaspoon salt, and 1/2 teaspoon black pepper in a bowl.
2. Thinly slice the beets with a mandolin or knife.
3. Arrange 1/3 of the beets, slightly overlapping in the baking dish. Spoon 1/3 of the sour cream over the beets, carefully spreading to cover. Sprinkle 1/3 of the cheese over the top. Lightly season with salt, pepper, and a pinch of thyme. Repeat with two more layers.
4. Transfer to the oven and bake until the beets are tender and the gratin is bubbly and golden, about 50 minutes.  Serve immediately or slightly warm.

The Cowgirls’ Guide to Cheese and Potato Gratin

Cowgirls gratin

Posted by Lynda Balslev 

I am not going to lie. I am a cheese fanatic. Those of you who know me already know this. I adore cheese, and relish serving it on pretty boards, tumbled into salads and cooked with gratins, pastas, eggs, you name it. I even call it dessert when given the choice. I think I know a little about cheese, gleaning knowledge from my international life, tasting, favoriting and cooking with locally produced cheese from the various countries I’ve called home and traveled to. People ask me about cheese, seek recommendations, and even pay me to create lavish baskets and wooden boards covered with blocks, rounds, wedges, and slabs of mild, creamy, floral, moldy cheese. And then I met this book: Cowgirl Creamery Cooks and realized that while I know about cheese, the gals at Cowgirl live it. And I envy them.

cowgirl book

Sue Conley and Peggy Smith are the Cowgirls behind the Marin creamery, located in Point Reyes, California. They met in college, and have both worked as chefs in Berkeley restaurants before launching Tomales Bay foods, which promoted West Marin’s farms and dairies to Bay area chefs. From there it was a quick leap to producing their own cheese from locally produced milk from Strauss Family Creamery. Nearly 20 years later, the Cowgirls are known throughout the Bay area and beyond, garnering numerous awards, including the induction into the Guilde des Fromagers.

This book is a great read for cheese lovers and organic food aficionados. Not only is it Conley and Smith’s personal story, it’s a how-to on all things cheese – including tasting, buying, storing, and pairing with 75 recipes and photographs by Christopher Hirsheimer and Melissa Hamilton. It will entertain and enlighten, and most importantly, leave you very hungry. Here is a taster.

Red Hawk Potato Gratin

Red Hawk is a rich triple-crème washed-rind cheese with a strong aroma and mellow flavor. Camembert may be substituted. Serves 6 to 8.

Recipe reprinted with permission from Cowgirl Creamery Cooks

2 tablespoons unsalted butter
2 tablespoons extra-virgin olive oil
1 medium yellow onion, julienned
3 garlic cloves, minced
1 cup heavy cream
2 ounces Parmesan cheese, grated
2 pounds Yukon gold potatoes, peeled and thinly sliced
10 ounces Red Hawk cheese, cut into 16 wedges

1. Preheat the oven to 350°F. Heat a cast iron skillet or saucepan over medium-high heat. Add the butter and olive oil to the pan. When the butter has melted, add the onion and garlic and sauté until soft, about 5 minutes. Take the pan off the heat and add the cream and half of the Parmesan.

2. Transfer half of the onion-cream mixture to a glass 13 by 9-inch baking dish or casserole. Arrange half the potatoes in an overlapping layer on top of the mixture, and then top with 8 of the Red Hawk wedges. Add the remaining potatoes in an even layer, the remaining half of the Red Hawk, and the remaining onion-cream mixture. Sprinkle with the remaining Parmesan.

3. Cover the dish with aluminum foil and bake for 45 minutes. Remove the foil and bake until the top is browned and bubbly, about 30 minutes. Let the casserole cool for 10 to 20 minutes. Serve warm.

Disclosure: I received a complimentary copy of Cowgirl Creamery Cooks. All opinions are my own. 

Baby Beet Gratin with Orange and Thyme

baby beet gratin tastefood

Beet Gratin with Orange and Thyme

It took a good long while for me to reconcile with the flavor of beets. I gazed at them from the sidelines, attracted to their vibrant hues, aware of their nutrient-rich flesh, yet wary of their earthy notes. As a cook, I wished to like beets, and as a parent, I wanted to serve them – so I willed myself to eat beets until I learned to love them.

At first, I took baby steps. I nibbled small bites. I  doused them with citrus to offset their earthiness. I grew bolder and roasted beets in olive oil, discovering that fire and char nicely counteract their dirt-like flavor. My go-to beet became the golden variety, which is pleasantly mild and nutty. And, eventually, I succeeded. Now, I am a beet convert. Yet while I no longer shudder at eating a completely naked beet, I continue to craft recipes that embrace the sweet beet while tempering their earthy nature.

This gratin recipe allows beets to shine amidst a minimal cast of characters. The co-stars of the dish happen to have their own strength and assertiveness, helping to tone down any earthy qualities that might be lurking in each bite. Layers of beets are cloaked in sour cream infused with orange zest and thyme. Gruyère cheese ripples throughout, adding a complementary nuttiness. The beets release their juices while cooking, saturating the gratin with spectacular color and all the flavors meld together. When I made this, it was so good, everyone at the table was reaching for seconds. As a cook, parent and beet convert, I find that a very good thing.

Baby Beet Gratin with Orange and Thyme

I prepared this recipe in individual ramekins with a variety of red, golden and chioggia beets. A gratin dish will also work for family style serving. Feel free to mix and match the beets to your taste. Eight large beets may be substituted for the baby beets, but be sure to peel the skin.

Makes 1 (8 by 8-inch) gratin or 8 (6-ounce) ramekins

2 cups sour cream
1 garlic clove, minced
1 teaspoon finely grated orange zest
Salt
Freshly ground black pepper
Unsalted butter
3 bunches baby beets, unpeeled, ends trimmed, scrubbed clean
4 ounces finely grated Gruyere cheese
Fresh thyme leaves

Preheat the oven to 375°F (190°C). Butter 8 (6-ounce) ramekins or an 8 by 8-inch square gratin dish. Whisk the sour cream, garlic, orange zest, 1/2 teaspoon salt, and 1/2 teaspoon black pepper in a bowl.
Thinly slice the beets with a mandolin or knife.
Arrange 1/3 of the beets, slightly overlapping in the baking dish or individual ramekins. Spoon 1/3 of the sour cream over the beets, carefully spreading to cover. Sprinkle 1/3 of the cheese over the top. Lightly season with salt, pepper, and pinch of fresh thyme. Repeat with two more layers.
Bake in the oven until the beets are tender and the gratin is bubbly and golden, about 45 minutes.  Serve warm or at room temperature.

Holiday Sides: Root Vegetable Gratin

root vegetable gratin tastefood

~ Root Vegetable Gratin with Sweet Potato, Red Potato and Rutabaga ~

My cheese and potato loving family loves a good gratin. I use a simple method of layering thinly sliced potatoes with a rich garlic infused sour cream and shredded Gruyere cheese. Simple and, yes, decadent. I switched up my go-to recipe recently when I wanted something more flavorful and nutrient-rich than white spuds. Thinly sliced rutabaga (also known as Swede) and sweet potato were included in the mix, and I switched out the white potatoes for red, which tend to hold their shape more while cooking. The result was a colorfully striated gratin, flecked with sage and thyme, adding their earthy fragrance to the sweet and nutty root vegetables. This is a wonderful side dish, and makes a rustic and festive addition to any holiday table.

Root Vegetable Gratin

Feel free to mix up the root vegetables to your taste. In all there should be about 3 pounds of vegetables.

Serves 8

16 ounces full fat sour cream
1 large garlic clove, minced
2 teaspoons minced fresh sage leaves
2 teaspoons fresh thyme leaves
1 teaspoon salt
1 teaspoon freshly ground black pepper
1/4 teaspoon ground nutmeg
4 medium-large red potatoes, about 1 1/2 pounds
1 large sweet potato, peeled, about 3/4 pound
1 medium rutabaga, peeled, about 3/4 pound
6 ounces Gruyère cheese, finely grated
1/3 cup heavy cream, or to taste

Preheat oven to 375 F (190 C). Butter an 8 by 10-inch gratin dish.
Whisk the sour cream, garlic, sage, thyme, salt, pepper and nutmeg in a bowl and mix well.
Thinly slice the potatoes and rutabaga, preferably with a mandoline. Arrange half of the red potatoes, overlapping, in the bottom of the gratin dish (there will be about 2 layers). Spread 1/4 of the sour cream over the potatoes and sprinkle with 1/4 of the Gruyere. Cover with the sweet potatoes, overlapping in about 2 layers. Spread with 1/4 of the sour cream and 1/4 of the gruyere. Repeat with the rutabaga, more sour cream and gruyere. Finish with the remaining red potatoes, sour cream and gruyere. Drizzle some of the cream around the edges and in the corners of the gratin without overfilling.
Bake in oven until vegetables are tender and the top of the gratin is brown and bubbling, about 1 hour and 15 minutes. (Loosely cover gratin with buttered foil if browning too fast.) Serve hot.

Roasted Vegetable Lasagna

vegetable lasagna tastefood~ Roasted Vegetable Lasagna ~

Eat your lasagna and have your vegetables too. Roasted strips of eggplant, zucchini and red peppers alternate with lasagna sheets in this veggie-enhanced family favorite. No worries, there’s plenty of gooey melted cheese and tomato sauce rippling through this version, the most adamant veggie haters (we won’t point fingers) will be hard pressed to complain.

Roasted Vegetable Lasagna
Serves  6

Extra-virgin olive oil
1 medium yellow onion, finely chopped
3 garlic cloves, minced, divided
1/2 teaspoon crushed red chili flakes
1 (28-ounce) can Italian plum tomatoes
1 teaspoon dried oregano
1 teaspoon sugar, or to taste
Salt
Freshly ground black pepper
2 large red bell peppers, halved, stemmed and seeded
2 medium eggplants, sliced lengthwise, 1/4-inch thick
3 medium zucchiini, sliced lengthwise, 1/4-inch thick
16 ounces whole milk ricotta
1 large egg
2 to 3 cups finely grated Pecorino Romano cheese
1 (8-ounce) ball fresh mozzarella, shredded
1 box lasagna sheets (you won’t use all of them)
Fresh basil leaves

Prepare sauce:
Heat 1 tablespoon oil in a medium saucepan. Add onion; saute until softened, about 3 minutes. Add 2 cloves garlic and red chili flakes; saute until fragrant, about 1 minute. Add tomatoes, oregano, sugar, 1 teaspoon salt, 1/2 teaspoon black pepper. Simmer uncovered 20 minutes, stirring occasionally and breaking up tomatoes with a wooden spoon.

Roast vegetables:
Heat oven broiler. Place peppers, cut-side down, in a baking dish. Broil peppers until skin is blistered all over. Transfer to a bowl and cover. Let stand 10 minutes, then peel away skin. Slice peppers in 1/2-inch strips.
Generously oil a rimmed baking sheet. Lay eggplant slices in one layer on sheet, turning to coat with oil. Season with salt and pepper. Broil until golden and tender, turning once. Transfer to a plate. Repeat with zucchini slices.

Ricotta:
Whisk ricotta, egg, 1 clove garlic, 1/2 cup Pecorino, 1/2 teaspoon black pepper in a medium bowl.

Assemble lasagna:
Heat oven to 350° F (180° C). Spoon a thin layer of sauce in bottom of 8 x 10-inch baking dish or gratin. Place a layer of lasagna sheets over the sauce, breaking them to fit to size as necessary. Smear ricotta over pasta. Arrange eggplant slices over the ricotta. Spoon a little sauce over the eggplant. Sprinkle with Pecorino and scatter some of the mozzarella over. Place another lasagna sheet over the eggplant. Repeat the layering process, substituting the zucchini for the eggplant. Repeat again with the red peppers. Top with the last layer of lasagna pasta. Smear with ricotta. Top with any remaining vegetables. Spoon sauce over and around the vegetables. Sprinkle with a final layer of Pecorino and mozzarella.
Bake in oven until thoroughly cooked through and cheese is bubbling, 45 to 55 minutes. Serve warm with basil sprinkled over.

Thanksgiving Side: Spinach Gratin with Cheesy Breadcrumbs

~ Spinach Gratin with Cheesy Breadcrumbs ~

You might also call this a “fill-in-the-blank gratin.” I had spinach in the fridge, but other sturdy greens such as kale or Swiss chard will work equally well in this recipe. The preparation is simple, consisting of sautéing the greens-of-your-choice, followed by a quick nap of cream. A crunchy topping of breadcrumbs and cheese finishes the gratins in the oven. And I dare say if there is someone in your family who is less inclined to favor these leafy superfoods, this gratin may be just the vehicle to get them munching.

Spinach Gratin

There is no thickener such as egg or flour in this recipe, so the results are akin to creamed spinach in a cup, with a cheesy breadcrumb topping. Because of this, I like to serve the gratin in individual ramekins. Makes enough for 4 individual gratins.

1/4 cup Panko breadcrumbs
1/4 cup finely grated Parmigiano or Pecorino Romano cheese
Freshly ground black pepper
1 tablespoon extra-virgin olive oil
1 small yellow onion, finely chopped, about 1/2 cup
1 garlic clove, minced
1/4 teaspoon red chili flakes
12 ounces fresh spinach leaves, coarsely chopped if large
1/2 cup heavy cream
1 teaspoon salt

Heat oven to 375 F. Mix breadcrumbs, cheese and 1/2 teaspoon black pepper together in a small bowl; set aside. Heat oil in a large pot or deep skillet over medium heat. Add onion and sauté until softened, about 3 minutes. Add garlic and red chili flakes. Sauté 1 minute. Add spinach, cover pot and cook over medium-low heat until leaves soften, about 2 minutes. Stir in the cream and salt. Simmer, uncovered, 1 minute. Divide spinach between 4 (3/4-cup) ramekins. Sprinkle with breadcrumbs and cheese. Bake in oven until tops are golden and gratins are bubbly, 15 to 20 minutes. Serve warm.

If you like this, you might enjoy these seasonal gratin recipes:
Potato Gratins from TasteFood
Broccoli Blue Cheese Gratin from Leite’s Culinaria
Roasted Yellow Beet and Ricotta Tian from TasteFood
Artichoke Hearst au Gratin from Kalyn’s Kitchen
Cauliflower au Gratin from TasteFood