Red Hot and Low-Sodium Chicken Wings


Red Hot and Low-Sodium Chicken Wings

This week, I jumped on board a food blog event hosted by Jessica, who has the wonderful blog SodiumGirl. The challenge? To create a favorite salty recipe with low-sodium content. While this obviously prohibited the use of salt, it also required the use of products with no more than 40 mg of sodium per serving. I was eager to give this a try, but a little apprehensive, since I love salt.

It was quite eye opening as I rummaged through my refrigerator and pantry in search of ingredients containing no more than 40 mg of sodium per serving. I am not only referring to staples such as mustard, cheese, sriracha, ketchup, mayonnaise, even Greek style yogurt.  As I scrolled a database for more nutritional references, I discovered that many proteins have a generous amount of natural sodium. My goal, then, was to select a protein with a relatively low amount of salt and devise a recipe around it using low or no-sodium ingredients.

Happily, dark chicken meat came in at a respectable sodium level, with drumsticks and thighs packing 46 mg per serving. This got me thinking about one of my favorite salty foods best associated with bars and football games: spicy wings. So, I decided to try and make a low sodium version of spicy wings.

An important factor in making this recipe is the use of lots of spices. I rubbed the chicken with a blend of paprika, coriander, cumin and cayenne and let the wings marinate for several hours. Then I roasted them in a hot oven for an hour, basting them with a spicy sauce which was a simplified cross between a buffalo wing and a BBQ sauce. Normally a generous squirt of sriracha would play a role in a recipe like this, but weighing in at 100 mg per serving, I improvised. Instead, I  whipped up a basting sauce with Tabasco, tomato paste and brown sugar. The results were excellent. The wings were crunchy, sticky and spicy – just the kind of finger-licking appetizer I imagined, minus any salt. And you know what?  I didn’t miss the salt at all.

Red Hot and Low-Sodium Chicken Wings

I use drummettes, which are the largest part of the chicken wing, because I prefer their relative meatiness. Serves 4 as an appetizer.

Wings:
3 pounds chicken wings or drumettes
2 tablespoons olive oil
2 teaspoons paprika
1 teaspoon ground cumin
1 teaspoon ground coriander
1 teaspoon freshly ground black pepper
1/2 teaspoon cayenne
4 tablespoons unsalted butter
2-4 tablespoons Tabasco (to taste)
2 tablespoons tomato paste
2 tablespoons brown sugar
1 tablespoon apple cider vinegar
1 tablespoon freshly squeezed lemon juice

Spiced Sour Cream Sauce:
1 cup sour cream
1 small garlic clove, minced
1 tablespoon lemon juice
Dash of Tabasco
1 tablespoon chopped fresh cilantro sprigs

Prepare the wings:
Whisk oil, paprika, cumin, coriander, cayenne and black pepper together in a large bowl. Add drummettes and toss to evenly coat. Cover and refrigerate at least 3 hours and up to 24 hours. 30 minutes before roasting, remove chicken from refrigerator.
Preheat oven to 425 F. (210 C.) Arrange drummettes on a oven grill pan. Roast 20 minutes. Turn chicken. Roast 20 minutes more.
While the chicken is roasting, make the basting sauce. Melt butter in a medium saucepan. Reduce heat and whisk in tomato paste, brown sugar, vinegar and lemon juice. Keep warm.
Remove chicken from oven and brush with tomato sauce. Return to oven and roast 10 minutes. Remove chicken and turn. Brush again with tomato sauce. Return to oven and roast until golden brown and cooked through, about 10 more minutes. Serve warm with Spiced Sour Cream Sauce for dipping.

Prepare the sauce:
Combine all of the ingredients in a small bowl.


Home-Cured Pork Belly and a Recipe for Caramelized Bacon Chips

Home-Cured Pork Belly and a Recipe for Caramelized Bacon Chips

I was tempted to call this post The Girl and the Pig, because, you see, I am hooked on bacon. More specifically, I am hooked on my own home-cured bacon. Prompted by the latest Charcutepalooza challenge, I cured 6 pounds of pork belly with a savory rub of salt, sugar, peppercorns, bay leaves and garlic. Sounds like a simple blend, yet when left to marinate and cure over a week, this basic recipe yielded swoon-worthy results.  For my first attempt, I pointedly avoided using lots of sugar or smoking the bacon. I wanted a savory result undistracted by excessive sweetness or the aroma of smoke: I wanted to taste the real deal, and it was worth it.

What to do with 6 pounds of home-cured bacon? (Oh, to be so lucky to have that problem.)  So far, I’ve eaten quite a bit, frozen half and given some away. Normally, I use bacon as an ingredient in salads, stews and pasta dishes, but this bacon is so good, I only want to eat it straight up, fried in a skillet or baked in the oven. So, in the spirit of simplicity, I decided to caramelize bacon chips, roasting them in the oven with spices and the previously forsaken sugar.  Sweet, salty, crispy and spicy – the results were utterly decadent. Now the question begs:  Is this a dessert, snack, condiment or food group? I say all of the above.

Caramelized Bacon Chips

If you can stand it, let the bacon chips thoroughly cool once removed from the oven. They will continue to crispen as they cool.

1 cup light brown sugar
1 teaspoon cayenne, or to taste
1/2 teaspoon ground cinnamon, or to taste
12 ounces thinly sliced bacon, cut in 2 inch strips

Preheat oven to 350 F. (180 C.)  Pour sugar onto a small plate. Dredge bacon in sugar, making sure that a good amount sticks. Lay bacon in a single layer on a grill pan. Sprinkle with cayenne and cinnamon.  Bake in oven until deep golden brown, without burning, turning once with a spatula, 12-15 minutes. Remove from oven and transfer bacon to a plate lined with parchment paper. Cool completely.

What is Charcutepalooza?
An inspirational idea hatched by Cathy Barrow and Kim Foster and now partnering with Food52. It celebrates a Year in Meat, where participating foodies and bloggers will cure, smoke and salt their way through Michael Ruhlman’s bestselling cookbook Charcuterie. 


Kale Slaw

Kale Slaw

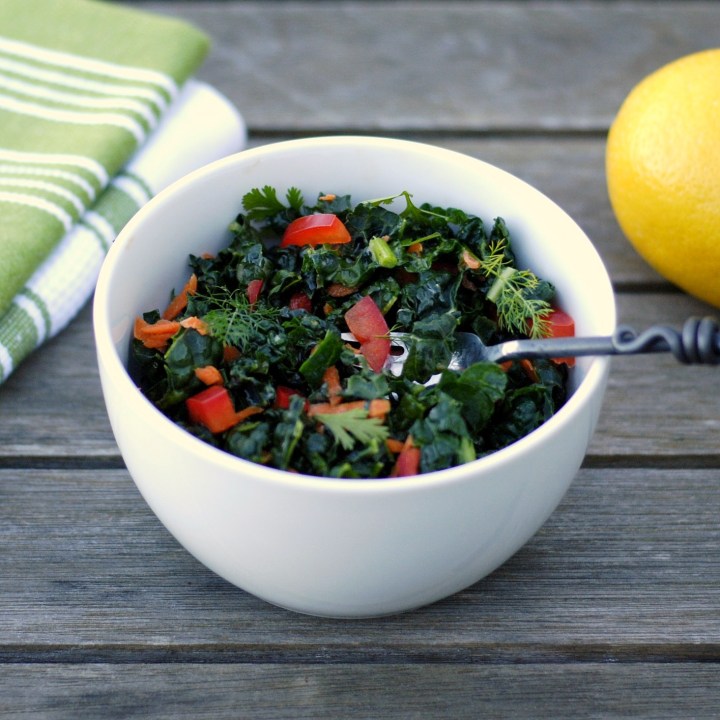
Yep, that’s kale slaw – not cole slaw. The star of this little bowl of goodness is healthy, nutrient-rich kale. Not only is kale considered a “superfood” it’s delicious and versatile to use. Try it raw in salads, braised with garlic and olive oil, blanched in soups, or crisp-roasted in the oven. Whichever method you choose, kale is a keeper. In this version of a slaw, sturdy lacinato kale replaces the usual cabbage. Accompanied by carrot shavings, sweet red pepper and chile, the kale is tossed with a cumin-infused Dijon vinaigrette. This a satisfying side dish which tastes great and looks pretty, too.

Kale Slaw
Makes 4 servings

I like the flavor of lacinato kale, an heirloom kale variety from Tuscany. It’s dark blue-green leaves retain their firmness in this slaw recipe. Feel free to substitute or combine other kinds of kale for a variety of color and texture.

2 tablespoons freshly squeezed lemon juice
1 teaspoon Dijon-style mustard
1/2 teaspoon ground cumin
1/2 teaspoon salt
1/2 teaspoon freshly ground black pepper
1/3 cup extra-virgin olive oil
1 bunch lacinato or Tuscan kale, tough ribs removed, leaves thinly sliced
1 large carrot, grated
1 small red bell pepper, stemmed, seeded, membranes removed, cut in 1/2 inch slivers
1-2 red fresno or serrano peppers, stemmed, seeded, membranes removed, minced
2 scallions, white and green parts thinly sliced
1/4 cup chopped fresh dill sprigs
1/4 cup cilantro or Italian parsley leaves

Combine lemon juice, mustard, cumin, salt and pepper in a small bowl. Slowly whisk in oil in a steady stream to emulsify. Set aside.
Combine remaining ingredients in a large bowl. Drizzle half of the vinaigrette over the salad and toss to thoroughly coat. Add additional vinaigrette to taste. Cover and refrigerate at least one hour and up to 4 hours. Serve with additional dill, cilantro or parsley sprigs as garnish.

Pear Clafouti

Pear Clafouti

I was recently served a pear clafouti for dessert at a dinner party. Never a fan of egg-y desserts, I have avoided eating clafoutis and flans – pointedly ignoring them in favor of other fruit filled desserts without the baked custard. As I bit into my clafouti, I suddenly realized that I all of this time I have been making a grave mistake. This clafouti was airy and luscious, rippling with pear and scented with vanilla. It was the perfect end to a dinner: not overly sweet, elegant and light. What had I been thinking?

So, the other night I made a clafouti. At first I was tempted to improvise, but I decided it might be wise to follow an appealing recipe first. (After all, I didn’t want to jeopardize my new-found interest with a less than perfect result.) After a quick perusal, I took inspiration from a recipe by Ina Garten. What I liked about her version was the use of heavy cream instead of milk and the infusion of the custard with lemon and pear brandy. Rich, bright and spiked: How could I resist? The following is my adaptation:

Pear Clafouti with Lemon
Serves 8.

Clafoutis:
1 tablespoon unsalted butter, room temperature
1/2 cup granulated sugar
3 large eggs, room temperature
1 1/2 cups heavy cream
1/3 cup all-purpose flour
Finely grated zest of one lemon
1/2 teaspoon ground cinnamon
1/4 teaspoon salt
2 tablespoons Pear Brandy
4 firm but ripe pears, peeled and cored

Whipped Cream:
1 cup heavy cream
1 tablespoon pear brandy
1 tablespoon sifted confectioners’ sugar

Preheat oven to 375 F. (190 C.) Butter a 10 inch tart pan or ceramic baking dish.
Beat sugar and eggs in bowl of electric mixer until light and fluffy, 3-4 minutes. Mix in cream, flour, lemon zest, salt and pear brandy. Set aside.
Thinly slice the pears. Arrange slices in a circular pattern in the tart pan. Pour custard over the pears. Bake in the oven until the filling is golden brown and set, about 35 minutes. Remove and cool slightly. Serve warm or at room temperature with whipped cream.

To make the whipped cream, beat the cream in bowl of electric mixer with whisk attachment until traces of the whisk are apparent in the cream. Add the brandy and sugar. Continue to beat until soft peaks form.

Roasted Chicken with Cardamom and Yogurt

Roasted Chicken with Cardamom and Yogurt


Roasted Chicken with Cardamom and Yogurt

Did you know that cardamom is referred to as the Queen of Spices? It makes sense, then, that this regal spice will behave like proper royalty, restrained yet in charge, when teamed with a slick of spices in a potent paste for roast chicken. As the chicken marinates for some hours, the heady aromas of garlic and ginger will waft about and you may think that cardamom’s perfume is all but lost. Don’t be fooled. These bold flavors are all swagger, and will be suitably tamed and smoothed with roasting. As their sharpness mellows, the elegant cardamom will gracefully step forward, shining through in the finished flavor of the meat and crispy skin.

Roasted Chicken with Cardamom and Yogurt

Butterflying the chicken ensures quick and even roasting. The yoghurt will tenderize the meat and contribute to the browning of the skin.  Serves 4-6.

6 cardamom pods, seeds removed
1 teaspoon black peppercorns
1 teaspoon ground cumin
1 teaspoon ground coriander
1 teaspoon sea salt
3 garlic cloves
1 tablespoon olive oil
1/2 cup whole milk greek style yogurt
1 tablespoon ground fresh ginger
1 tablespoon freshly squeezed lemon juice

1 3-4 pound chicken, butterflied

Grind cardamom seeds and peppercorns in a mortar with pestle to a powder. Add cumin, coriander, salt and garlic and smash together. Add olive oil to form a paste. Stir in yogurt, ginger and lemon juice.  Smear spices between skin and breast and all over the chicken, front and back. Refrigerate at least 2 hours and up to 24 hours. 3o minutes before roasting, remove chicken from refrigerator.
Preheat oven to 425 F. (210 C.) Place chicken breast-side up in a baking pan or cast iron pan. Bake in oven until thoroughly cooked, 45  minutes – 1 hour. Remove from oven and let rest 15 minutes. Carve and serve.

Korean-Style Beef Lettuce Cups

Korean-Style Beef Lettuce Cups

There is something primally satisfying about eating with your hands, and with Korean-Style Beef Lettuce Cups you will enjoy that pleasure and more: satisfying, juicy and seriously good finger food with the extra kick of spice.  This is fun food to make and eat – perfect for a casual, interactive dinner party. Line the table with bowls of condiments and rice and platters of beef and lettuce leaves. Then let everyone assemble their own cups. Pile the meat on fresh lettuce leaves along with rice and a sprinkle of condiments. Drizzle some of the reduced meat sauce over the rice and serve with a squirt of sriracha.

Korean-Style Beef Lettuce Cups

A key to the flavor of this recipe is the beef marinade. Strips of beef soak in a rich, umami-ish sauce fortified with stout, and are pan-fried until browned and slightly caramelized. The sauce is then reduced to an intense salty, sweet, hot sauce for drizzling. Serves 6-8.

For the meat:
1/2 cup soy sauce
1/2 cup dark beer
3 garlic cloves, minced
3 tablespoons brown sugar
2 tablespoons freshly squeezed lime juice
2 tablespoons sriracha
1 tablespoon sesame oil
2 pounds New York strip or rib-eye steak, cut cross-wise in very thin slices

For the condiments:
1 large carrot, peeled and grated
Juice of 1/2 lime
1 bunch scallions, white and green parts thinly sliced
1 cup fresh mint leaves
1 cup fresh cilantro leaves
1/3 cup sesame seeds, lightly toasted
Sriracha
2 cups basmati or sushi rice, cooked
1-2 heads green leaf lettuce, leaves separated, washed and dried

Prepare the marinade:
Whisk together soy sauce, stout,  garlic, sugar, lime juice, sriracha and sesame oil in a large bowl. Add meat and toss to thoroughly coat the meat. Let sit at room temperature 1 hour or refrigerate covered up to 24 hours.

Prepare condiments:
Toss carrot with lime juice in a small bowl. Place scallions, mint, cilantro, sesame seeds, sriracha and rice in individual serving bowls. Arrange lettuce on a platter.

Prepare Meat:
Heat 1 tablespoon peanut or vegetable oil in a skillet or grill pan over medium high heat. Add beef strips in batches in one layer without overcrowding. Brown on both sides. Transfer to a platter; keep warm. Once all the beef has been cooked, pour the remaining marinade and any collected meat juices into the skillet. Bring to a boil and reduce until somewhat thickened. Pour into a small bowl.

To serve, top a lettuce leaf with a few spoonfuls of rice, 1-2 meat strips and a spoonful of the marinade reduction. Sprinkle with the other condiments and drizzle with sriracha. Roll up and eat.

Lemon Bars

Citrus is winter’s gift, so why not put this gift to use and make lemon bars? Bright and zingy, Lemon Bars will bring a ray of sunshine into your kitchen. Whether you are knee deep in snow or lucky enough to live where lemons grow on trees, this is one pick-me-up everyone will enjoy at this time of year. Cool creamy custard bursting with zest rests on a firm bed of shortbread. Each bite is a balance of sweet and tart. The recipe is simple and quick to make – the only caveat is that the results are dangerously addictive. Be forewarned: One will never be enough.

Lemon Bars with Sea Salt

This recipe is adapted from and inspired by many sources, including Ina Garten, Food52,  and my personal weakness for sea salt. Makes 32 (2-inch) square bars.

Shortbread:
2 cups all-purpose flour
1/2 cup confectioners’ sugar
1/2 teaspoon salt
1 cup unsalted butter, slightly softened but still cool, cut into cubes

Filling:
6 large eggs
2 cups granulated sugar
1 cup freshly squeezed lemon juice
1/2 cup all-purpose flour, sifted
2 tablespoons finely grated lemon zest
1/4 teaspoon salt

1. Preheat the oven to 350°F. Butter a 9 by 13-inch baking pan, then line the pan with parchment and butter the parchment.
2. Combine the shortbread ingredients in the bowl of an electric mixer fitted with a paddle attachment. Mix until the dough resembles coarse lumps and just begins to come together. Dump the dough into the prepared pan and, with your fingers, evenly press the dough to cover the bottom of the pan.
3. Bake the crust until it just begins to turn golden, about 20 minutes. Remove from oven, but do not turn off the oven heat.
4. Whisk the filling ingredients together in a large bowl until blended, then evenly pour over the crust. Return the pan to the oven and bake until the filling is set but not coloring, about 25 minutes. Remove and cool completely on a rack.
5. Cut into bars. Dust with confectioners’ sugar and lightly sprinkle with sea salt flakes before serving.

Boar Ragu with Pappardelle

Boar Ragu with Pappardelle

Ever since a trip to Umbria last year when we ate a succulent wild boar ragu in an obscure village restaurant, I have had boar on my mind.  The ragu was served over a platter heaped with pappardelle. The meat was falling apart tender, dissolving in a rich wine sauce perfumed with juniper and cloves. Since then, that meal has been a popular conversation topic in our family when reflecting on our trip. So, I decided to try and make my own boar ragu.

Boar meat may be ordered from your butcher and, depending on where you live, you may find it in specialty stores that carry game meat. I ordered my meat from Broken Arrow Ranch in Texas, where they raise ranch-raised boar. The meat arrived frozen in a cooler box and I popped it into my freezer, so it would be ready when I devised a recipe.

The flavor of boar may be likened to a cross between pork and lamb. Boar meat is very lean and rich in protein. It has more protein than beef or pork and is lower in cholesterol than chicken. Not bad for an animal deemed an exotic pest in the U.S. Due to its mild gamey flavor and lack of fat, boar meat benefits from marinades and slow cooking, and it’s well matched with spirits and aromatic spices such as cloves and juniper.

Boar Ragu with Pappardelle

As the ragu simmers, the boar meat will absorb a good deal of the liquid. The ragu may be made up to 2 days in advance, allowing the flavors to develop with time. As an alternative to pasta, serve over polenta. Serves 4-6.

3 tablespoons olive oil
1 pound boar shoulder, cut in 1 inch chunks
Salt
Freshly ground black pepper
1 large onion, chopped
2 carrots, chopped
4 large garlic cloves
1 – 28 ounce can Italian plum tomatoes with juices
2 cups full-bodied red wine
4 bay leaves
Bouquet garni: 1 tablespoon crushed juniper berries, 8 black peppercorns, 6 whole cloves, tied in cheese cloth with kitchen string

Grated Parmigiano-Reggiano cheese

Heat 2 tablespoons olive oil in a skillet. Season boar all over with salt and pepper. Add boar to the skillet in batches and brown on all sides, taking care not to overcrowd the pan. Transfer meat to a bowl. Add 1 tablespoon oil. Sauté onion, carrots and garlic, scraping up brown bits, until they begin to soften, 4 minutes. Return boar with any juices to the pan. Add tomatoes, red wine, bay leaves and bouquet garni. Bring to a boil. Reduce heat and simmer over very low heat, partially covered, until meat is falling tender and sauce is reduced by half, 2 hours. Serve with pappardelle and top with grated cheese.

Winter Greens Salad with Cranberries and Pistachios

Winter Greens Salad with Cranberries and Pistachios

As much as I like a warming winter stew, I also appreciate a fresh winter salad. In fact, they both go well together.  The crisp bitter greens are a nice palate cleanser and contrast to a rich, meaty stew. I made this salad the other night with a mix of seasonal greens: mizuna, arugula, beet greens and chicory. Feel free to tinker with the combination, depending on what’s in the fridge and market, but keep in mind a variety of leaves and colors for a pretty presentation. Dried cranberries and pistachios add chewy, crunchy substance to the greens as well as a touch of sweetness and salt. I happened to spot baby rainbow carrots at the farmers market that day, and tossed a few in for extra color and texture. Don’t throw out the carrot tops. If they are bright and fresh, they can join the greens.

Winter Greens Salad with Cranberries and Pistachios
Serves 4-6

8 cups mixed winter greens, such as frisée, arugula, mustard, beet greens, chicory, mizuna
2-3 baby carrots, green tops reserved, peeled and thinly sliced on the diagonal
1 handful fresh flat leaf parsley and/or cilantro sprigs
2 tablespoons dried cranberries
2 tablespoons shelled pistachios

Apple Cider Vinaigrette (recipe below)

Wash and dry the salad leaves. Place in a large bowl. Coarsely chop carrot greens if using. Scatter carrot greens,  carrots, parsley, cranberries and pistachios over the leaves. Pour dressing over salad and toss to combine. Serve immediately.

Apple Cider Vinaigrette:
3 tablespoons apple cider vinegar
1 small shallot, minced
1 teaspoon Dijon-style mustard
1/2 teaspoon salt
1/2 teaspoon freshly ground black pepper
1/3 cup extra virgin olive oil

Prepare vinaigrette. Combine vinegar, shallot, mustard, salt and pepper in a small bowl. Whisk in oil in a steady stream to emulsify.

Moroccan Lamb Stew and a recipe for Ras el Hanout

Still fixated on warming stews, I recently prepared this lamb stew which not only has heat but the heady aroma of exotic spice. Its secret ingredient is ras el hanout. Ras el hanout is a north African spice blend which may include upwards of 50 spices, including cinnamon, cardamom, clove, turmeric and cayenne. The name, translated, means head of the shop, meaning the best on offer. Like many spice blends, there is no one way to make it, and variations exist from home to home, merchant to merchant.

At first, I made a version of this stew without the addition of ras el hanout, and it was very good. When I added ras el hanout to the recipe, the stew was excellent. You can find ras el hanout in the spice section of your supermarket or specialty stores. If you cannot locate it, then I encourage you to try to make your own version – it’s easy to do.

Moroccan Lamb Stew with Chickpeas and Figs

The lamb is coated and marinated in a spice paste. As the meat browns in the pot, the spices will also brown and cook, adding a rich flavor and color to the stew.

Serves 6-8.

1/4 cup plus 2 tablespoons olive oil
2 teaspoons ground coriander
1 teaspoon ground cumin
1 teaspoon ground paprika
Salt
Freshly ground black pepper
2 1/2 – 3 pounds lamb shoulder or leg, cut in 2 inch chunks
1 large onion, chopped
1 large carrot, chopped
5 garlic cloves, chopped
1 tablespoon grated fresh ginger
1 – 14 ounce can Italian plum tomatoes with juice
2 cups chicken stock
12 dried Calimyrna or Turkish figs, halved
1 cinnamon stick
2 teaspoons ras el hanout (recipe below)
1 – 14 ounce can chickpeas, drained
1 tablespoon brown sugar

Harissa or red chili paste
Fresh cilantro sprigs

Combine 1/4 cup olive oil, coriander, cumin, paprika, 2 teaspoons salt and 1 teaspoon black pepper in a small bowl. Mix to form a paste. Place lamb in a large bowl. Rub paste all over lamb. Let sit at room temperature for 2 hours or refrigerate covered up to 24 hours.
Preheat oven to 325 F. Heat 2 tablespoons olive oil in a Dutch oven or oven proof pot with lid over medium-high heat. Add lamb in batches and brown on all sides, taking care not to overcrowd the pan. Transfer lamb to a plate or bowl.
Add onion and carrot to the same pot. Saute, stirring up the brown bits, for 2 minutes. Add garlic and ginger and continue to saute 1 minute. Add tomatoes, chicken stock, figs, cinnamon stick, ras el hanout, 1 teaspoon salt and 1 teaspoon black pepper.  Return lamb and any collected juices to the pot, submerging it in the stock. (Add additional chicken stock to cover, if necessary.) Bring to a boil, then reduce heat to a simmer and cover pot. Transfer to oven and bake until lamb is falling apart tender, about 2 hours.
Transfer pot to stove. Remove lamb and vegetables with a slotted spoon and place in a bowl. Bring stock to a boil over medium-high heat. Boil uncovered until sauce is reduced by about half and thickened, skimming fat.  Stir in chickpeas. Taste to check for seasoning. If necessary add a tablespoon of brown sugar to the stock. Return lamb and vegetables to pot. (May be prepared up to 24 hours in advance. Cover and refrigerate. To serve, skim any collected fat from surface. Rewarm over medium-low heat or in a 325 F. oven.)
Serve with prepared couscous. Pass bowls of harissa and fresh cilantro around the table as condiments.

Ras El Hanout
adapted from The Food of Morocco by Tess Mallos

Be sure to use very fresh spices, or grind the whole dried spices.

3 teaspoons ground cinnamon
3 teaspoons ground coriander
3 teaspoons ground nutmeg
2 teaspoons allspice
2 teaspoons ground cumin
2 teaspoons ground ginger
2 teaspoons ground turmeric
2 teaspoons ground black pepper
2 teaspoons ground cardamom
1/2 teaspoon ground cloves
1/2 teaspoon ground cayenne

Combine all the spices together. Store in a glass jar in a cool, dark place.
(Recipe may be halved.)