Spring Chicken and Vegetable Soup

Spring Chicken and Vegetable Soup

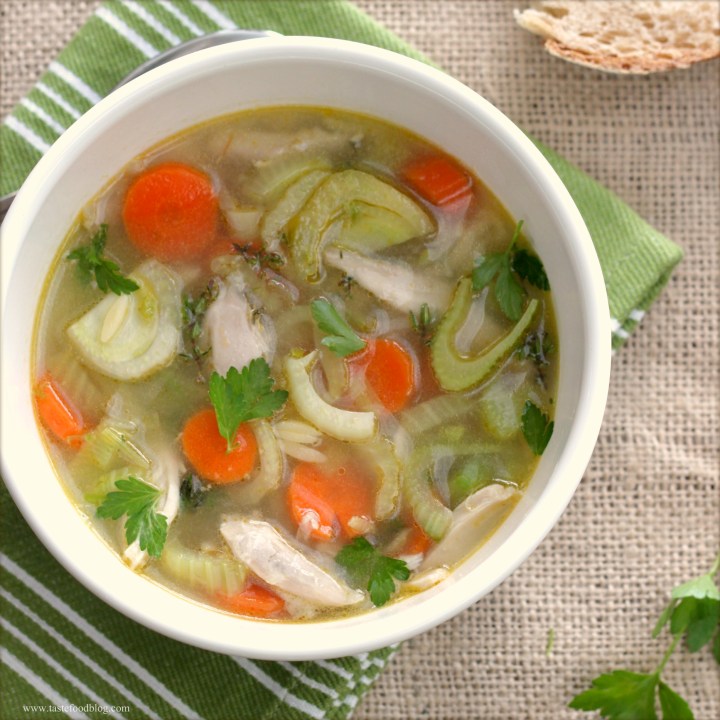
Here is another soup recipe that sings spring. Spring Chicken and Vegetable Soup is filled with seasonal vegetables including green garlic. Appearing in the markets right now, green garlic is the younger rendition of the ubiquitous papery garlic bulb. Like any youngster, this version  is sassy, sharp and full of swagger. But with a little heat, all of that bravado fades away. The green garlic softens, mellows and loses its pungency, resulting in a smooth aromatic backdrop to this light and healthy soup.

Spring Chicken and Vegetable Soup

Serves 4 to 6

1 tablespoon olive oil
1 cup chopped green garlic, white and pale green parts
Salt
1 large fennel bulb, thinly sliced
2 large carrots, thinly sliced
4 cups chicken stock
1 cup orzo
1 tablespoon fresh thyme or 1 teaspoon dried
1 1/2 cups shredded cooked chicken meat (optional)
1/4 cup chopped flat leaf parsley, coarsely chopped

Heat oil in a soup pot over medium heat. Add green garlic and 1 teaspoon salt. Sauté until garlic softens and its aroma loses its sharpness, 5 minutes. Add fennel and carrots and continue to sauté until the vegetables brighten in color and begin to soften, 2 minutes. Add stock, orzo and thyme. Bring to a boil, then reduce heat to a simmer. Simmer, partially covered until orzo is cooked through and vegetables are tender, 15 – 20 minutes. Taste for salt. Stir in chicken and parsley; continue to cook until the chicken is warmed through. Serve immediately in warm bowls.

Asparagus Soup

Asparagus Soup

Nothing says spring to me more than the arrival of asparagus in the markets. Their green stalks fill the shelves, upright and dignified, like silent soldiers adorned with purple-tinged crowns. I can’t help myself: I grab one bunch, then another, heaping them in my basket, while eyeing others for even firmer, taller, more deeply colored specimens. If I see them, I’ll take them.

Once home, they need to be put to use – steamed with lemon and olive oil, oven-roasted for a little char, shaved raw into salads, and, of course, in soup. This recipe is simple and relatively minimal, as an asparagus soup should be. Too many flavors will overpower their subtle grassy flavor. A little cream is added to the soup for body and richness, and a sprinkling of Pecorino cheese for garnish adds that extra umami quality, begging for seconds.

Asparagus Soup

Serves 4-6

1 pound asparagus spears
1 tablespoon unsalted butter
1 tablespoon olive oil
1 medium onion, chopped
Salt
4 cups chicken stock
1/2 cup heavy cream
Freshly ground black pepper
1/4 cup finely grated Pecorino Romano cheese

Trim and discard the woody ends of the asparagus. Cut and reserve 4-6 asparagus tips, 2 inches in length. Slice remaining spears in 1/4 inch pieces.
Melt butter with the oil in a soup pot over medium heat. Add onion and 1/2 teaspoon salt. Sauté onion until translucent without browning, about 2 minutes. Add asparagus pieces and sauté until brightened in color and beginning to soften, 2 minutes. Add stock; bring to a boil then reduce heat and simmer, partially covered, until asparagus are very tender, about 20 minutes.
While the soup is simmering, blanch the reserved asparagus tips in salted boiling water until bright in color, 30 seconds. Drain and rinse under cold water; set aside.
Purée soup with an immersion blender or carefully in batches in a food processor. Return to soup pot. Add cream and black pepper and heat through to serving temperature. Taste for seasoning. Serve in bowls or glasses, sprinkled with pecorino cheese. Garnish with asparagus spears.

Farrotto with Shiitake Mushrooms and Beets

You know, I could just call this Farro with Shiitake Mushrooms and Beets, but Farrotto sounds much more fun.  Farrotto?  Yes, if you switch out the rice from risotto with farro, then you end up with farrotto,  a grain steeped in stock – minus the requirement for non-stop stirring. Another difference from rice based risotto, is that farro has a pleasingly chewy texture, never succumbing to mushiness. Each nutty whole wheat grain maintains its shape,  exuding earthy wholesomeness. You can’t help feeling healthy when you eat it.

Farro has an ancient pedigree, originating in the Mediterranean and the Middle East. Also known as emmer, and compared to spelt, farro is a species of wheat, high in fiber and rich in protein and B vitamins. It’s delicious in salads, pilafs, breads, soups and stews. If you haven’t tried it, you should. It’s healthy, economical and delicious.

Farrotto with Shiitake Mushrooms and Yellow Beets

Active Time: about 1 hour
Total Time: about 1 hour
Serves 4

1 tablespoon unsalted butter
2 tablespoons olive oil, divided
1 small shallot, finely chopped, about 2 tablespoons
8 ounces shiitake mushrooms, sliced 1/4-inch thick
Sea salt
1 large garlic clove, minced
1 teaspoon thyme
1 cup semi-pearled farro, rinsed and drained
1/4 cup dry white wine
2 cups chicken stock (or mushroom stock for vegetarian version)
1 medium yellow beet, about 8 ounces, peeled and diced
2 tablespoons chopped Italian parsley, plus extra for garnish
1/2 teaspoon freshly ground black pepper
1/4 cup crumbled fresh goat cheese or feta, optional

1. Melt the butter with 1 tablespoon olive oil in a large saucepan over medium heat. Add the shallot and sauté until softened, about 2 minutes. Add the mushrooms, lightly season with salt, and cook until they begin to soften and release their juices, 3 to 4 minutes, stirring constantly. Add the garlic and thyme and sauté until fragrant, about 30 seconds. Add the farro and cook until slightly toasted, about 2 minutes, stirring constantly. Pour in the wine and stir until absorbed. Add the stock and 1/2 teaspoon salt and bring to a boil. Reduce the heat to low and cover the pot. Simmer until the farro is tender and the liquid has been absorbed, 30 to 40 minutes.
2. While the farro is cooking, heat the oven to 400°F. Toss the beets, 1 tablespoon oil, and 1/4 teaspoon salt in a bowl. Spread on a small rimmed baking sheet or in a baking pan and roast in the oven until the beets are tender and golden brown in spots, about 20 minutes.
3. When the farro is ready, stir in the beets, parsley, and black pepper. Serve garnished with additional parsley and crumbled fresh goat cheese, if using.

Strawberry Rhubarb Cobbler

Strawberry Rhubarb Cobbler

Rhubarb is the culinary equivalent of the groundhog. When its fuscia stalks emerge in the markets, you know that spring is nearly here. Luckily, rhubarb’s best friend, the strawberry, also make an early spring debut in California, jostling for attention with the well-established lemons and oranges crowding the supermarket shelves. Never one to look a gift horse in the mouth, I’ve combined all of these seasonal goodies in this dessert recipe. Strawberries, rhubarb and lemon muddle together in this impossibly bright cobbler, while a crumbly sweet dough flecked with lemon zest attempts to keep a lid on the bubbling fruit.

Strawberry Rhubarb Cobbler
Serves 6

For the filling:
2 cups diced rhubarb
1 pound strawberries, hulled, sliced 1/4 inch thick
1/2 cup granulated sugar
2 tablespoons freshly squeezed lemon juice
1 tablespoon cornstarch
2 teaspoons finely grated lemon zest
1/4 teaspoon ground cinnamon

For the topping:
1 cup all-purpose flour
1/3 cup granulated sugar
1 1/2 teaspoons baking powder
1/2 teaspoon salt
1/4 cup unsalted butter
1/4 cup heavy cream
1 egg
1 teaspoon finely grated lemon zest

Make the filling:
Combine all of the filling ingredients together in a bowl and toss to combine. Let stand at room temperature for 20 minutes.

Make the topping:
Combine flour, sugar baking powder, salt and butter in bowl of a food processor. Pulse until dough resembles coarse meal. Add cream and egg; pulse until dough comes together. Pulse in lemon zest.

Spoon strawberries into a baking pan or individual ramekins. Drop spoonfuls of the topping over the fruit. Bake in a pre-heated 350 F. oven until the topping is golden and the filling is bubbly, 30-40 minutes. Remove from oven and cool slightly. Serve slightly warm or at room temperature. The flavors will develop as the cobbler cools. Serve with creme fraiche.

Roasted Yellow Beet and Ricotta Tian

I find it impossible to resist beets. Their colors are magnificent – it’s a miracle that nature can provide something edible that is so vibrantly hued. With the vivid color, of course, comes nutrients. Beets are a nutritional powerhouse, rich in antioxidants, vitamins, and beta-carotene. I purchased these beets at the farmers’ market, without knowing how I would prepare them. I was happy to simply look at them.

Prompted by a batch of fluffy ricotta in my fridge, I decided to layer the yellow beets with the cheese as a riff on lasagna, with the beet slices replacing the lasagna sheets. Yellow beets are milder in flavor than red beets, and their nutty, buttery flavor wouldn’t overpower the cheese. I also feared the red beets would completely saturate the dish with their magenta color, which, while lovely to look at, threatened to irrevocably tint my pristine ricotta. This is a visually motivated dish.

Roasted Yellow Beet and Ricotta Tian

Active Time: 20 minutes
Total Time: 1 hour and 10 minutes
Serves 4; Makes one (8-inch) tian or 4 individual ramekins

1 pound yellow beets (about 4 medium)
12 ounces whole milk fresh ricotta, drained of excess liquid
2 tablespoons finely grated Parmesan cheese, plus extra for sprinkling
2 tablespoons finely chopped fresh basil, plus extra for garnish
1 small garlic clove, minced
1 teaspoon finely grated lemon zest
1 teaspoon salt
1/2 teaspoon freshly ground black pepper
Extra-virgin olive oil

  1. Preheat the oven to 350°F.
  2. Trim the greens and ends of the beets and peel the skin. Thinly slice the beets, preferably with a mandoline, about 1/8-inch thick.
  3. Combine the ricotta, Parmesan, basil, garlic, lemon zest, salt, and the black pepper in a bowl and whisk to blend.
  4. Arrange the beets in one layer, slightly overlapping, in an 8-inch diameter gratin dish (or 4 individual ramekins). Lightly brush the beets with olive oil. Smear a layer of the ricotta over the beets. Repeat the layering process, finishing with a thin layer of ricotta on the top (some of the beets should be showing). There should be about 4 layers. Sprinkle 1 to 2 teaspoons Parmesan cheese over the tian.
  5. Transfer to the oven and cook until the beets are tender when pierced with a knife, about 50 minutes. If the top begins to brown before the beets are fully cooked, loosely cover with foil. Remove from the oven and let stand at least 15 minutes before serving.
  6. Serve warm or at room temperature garnished with fresh chopped basil.

Wined and Brined Pork Rib Roast

Wined and Brined Pork Rib Roast

Round 3 Charcutepalooza challenge: The Brine – and a Pork Rib Roast

I love brines. Give me an extra 24 hours, a box of sea salt and some spices, and I will happily submerge poultry and meat in a liquid bath. A long soak adds moisture to the protein while it brines for hours or even days, ensuring succulent results. This  month’s Charcutepalooza challenge dictated a brine, and I chose pork for several reasons. Lean pork meat can easily dry out, so it is a perfect candidate for moisture inducing brines. I also confess that I like pork best when it’s fortified and embellished with strong umami flavors and marinades, smoothing out the pork’s, er, porky flavor.

To this brine I added white wine, inspired by a pleasant memory of an exquisite roasted pork saddle we enjoyed at Incanto Restaurant in San Francisco. While a recipe was never divulged, Chef Chris Cosentino shared with us that he marinated the pork in wine for several days. And he knows his pork – which rocks. So, inspired by this memory and Charcutapalooza, I made this pork rib roast.

Wined and Brined Pork Rib Roast

If possible, let the pork brine for several days. I brined this roast for 4 days, and the results were flavorful, juicy and tender. Serves 8.

For the brine:
4 quarts water, divided
1 – 750 ml. bottle dry white wine
1 cup light brown sugar
3/4 cup coarse sea salt or kosher salt
8 sage leaves
4 rosemary sprigs
4 bay leaves
1 teaspoon juniper berries
1 teaspoon black peppercorns

1 pork rib roast, with 8 bones

For the roast:
2 garlic cloves
2 tablespoons fresh rosemary
1 tablespoon black peppercorns
4 sage leaves
2 tablespoons Dijon-style mustard
1 tablespoon freshly squeezed lemon juice
1 tablespoon olive oil

Combine 1 quart water and remaining brine ingredients (not the pork) in a pot large enough to hold the roast. Bring to a boil and cook, stirring until the salt and sugar dissolve. Remove from heat, stir in remaining 3 quarts of water and cool completely. Add pork. If pork is not entirely submerged, add additional water to cover. Cover pot and refrigerate at least 24 hours and up to 4 days.

Roast the pork:
3 hours before roasting, remove the pork from the brine and rinse under cold water. Pat dry with paper towels and refrigerate, uncovered.
Remove from refrigerator 1 hour before roasting. Smash garlic, rosemary, peppercorns and sage leaves in a mortar with pestle. Whisk in mustard, lemon juice and olive oil. Smear the paste all over the pork. Place on a rack in a baking pan. Roast in a preheated 400 F. oven until an instant-read thermometer registers 140 F. Let the pork roast rest 20 minutes before carving. Serve garnished with sage leaves and lemon wedges.

What is Charcutepalooza?
An inspirational idea hatched by Cathy Barrow and Kim Foster and now partnering with Food52. It celebrates a Year in Meat, where participating foodies and bloggers will cure, smoke and salt their way through Michael Ruhlman’s bestselling cookbook Charcuterie.
Cauliflower au Gratin

Cauliflower au Gratin

Who can’t resist a Cauliflower Gratin? Perfect as a side dish or vegetarian course, these golden gratins are bubbling with cheesy goodness. I found yellow cauliflower at the market and mixed it with white cauliflower in this recipe. Don’t just experiment with color. Get creative with other veggies, such as  broccoli florets, chunks of celeriac or diced rutabaga for variety and flavor. So long as there’s lots of gratinéed cheese and bechamel, this gratin is a winner.

Cauliflower Gratin
Serves 4

1 large head of cauliflower, broken into florets
3 tablespoons unsalted butter
3 tablespoons flour
2 cups whole milk
1 teaspoon salt
1 teaspoon ground mustard
1/2 teaspoon freshly ground black pepper
1/4 teaspoon ground nutmeg
4 ounces Gruyere cheese, finely grated
2 tablespoons finely grated Parmesan cheese
2 tablespoons panko breadcrumbs, lightly toasted

Preheat oven to 375 F. (190 C.)  Butter a gratin dish or 4 individual ramekins.
Steam cauliflower until crisp tender. Transfer to a large bowl. Melt butter in a small saucepan over medium heat. Whisk in flour, and cook, stirring, 2 minutes. Add milk in a steady stream, whisking constantly. Cook, stirring, until bechamel thickens. Whisk in salt, mustard, pepper and nutmeg. Add half of the Gruyere cheese, whisking until smooth. Pour the bechamel over the cauliflower. Toss to thoroughly coat. Pour into the gratin dish. Combine remaining Gruyere cheese, Parmesan and panko in a small bowl. Sprinkle over the top of the gratin. Bake until golden on top and bubbling, about 30 minutes.

Golden Onion Tart with Gruyère and Thyme

Golden Onion Tart with Gruyère and Thyme

This tart is a vehicle for caramelized onions. It’s also inspired by an appetizer I ate years ago in a Swiss auberge overlooking the Lake of Geneva. It’s been so long, I can’t remember the name of the restaurant, but I do remember the onion tart. It was simple and rustic, just like the half-timbered dining room with its roaring open fire where we tasted it. Sweet, rich and minimal, this tart was perfection in its simplicity. Today I make a version of this memory while we enjoy another view from our California home. I like to serve it in small slivers with glass of wine before dinner.

Golden Onion Tart with Gruyère and Thyme
Serves 8 to 12

For the dough – adapted from a recipe by Alice Waters:
1 cup all-purpose flour
1/2 teaspoon salt
6 tablespoons unsalted butter, chilled, cut in 1/4 inch cubes
3 tablespoons ice water

Stir flour and salt together with a fork. Toss in butter. Work the butter into the flour with a fork or your fingertips until it resembles coarse meal, with some pieces of the butter apparent. Sprinkle in the water while stirring with a fork until the dough comes together, adding another tablespoon of water if necessary. Form into a ball and flatten. Wrap in plastic wrap and refrigerate 1 hour

For the filling:
2 tablespoons olive oil
2 pounds yellow onion, peeled and thinly sliced
1 teaspoon salt
2 tablespoons port wine
1 teaspoon freshly ground black pepper
2 ounces finely grated Gruyère cheese
1 teaspoon fresh thyme, plus extra for garnish
1 egg, slightly beaten

Heat olive oil over medium heat in a deep skillet or pot. Add onions and salt. Cook onions, stirring occasionally, until they are golden brown, soft and squidgy, about 30 minutes. Add port wine and cook, stirring, 2 minutes. Remove onions from heat and stir in the pepper. Cool slightly.
While the onions are cooling, roll out the dough to fit in the bottom and up the side of a 10 inch round tart tin. Sprinkle half of the cheese over the bottom of the tart. Spoon onions into the shell and spread evenly. Sprinkle 1 teaspoon thyme over the onions. Brush the exposed crust rim with the egg wash. Sprinkle the tart and crust with the remaining cheese.
Bake in a preheated 375 F. oven until the crust is firm and golden and the onions have turned a rich golden brown, without blackening, about 30 minutes. Remove and cool slightly. Serve slightly warm or at room temperature garnished with thyme sprigs.

Cuban-Inspired Braised Beef with Oranges

Cuban-Inspired Braised Beef with Oranges


Cuban Inspired Braised Beef with Oranges 

If you have a teenage boy in the family, you may understand the following. If not, please enjoy this researched, significantly adapted and tested recipe of Hispanic origin.

Son: I have an assignment due tomorrow in Spanish. I have to bring in a prepared recipe of hispanic origin.
Me: When are you making it?
Son: I have 2 finals I have to study for tonight after presenting a research project to the sophomore class and faculty before sailing practice after school.
Me: When are you helping me make it?
Son: After my homework and before bed, probably not before 11 pm – if I haven’t fallen asleep.
Me: What am I making?
Son: I found this recipe on the internet for Cuban Carne Asada with Oranges that sounds good.
Me: Yes it sounds good. In fact what makes it so good is that it requires at least 3 hours to marinate and another 3 hours to slow-cook.
Son: Is there a quick version?
Me: That is the quick version. It tastes better if it marinates overnight.
Son: I will help you as much as I can. I promise. This recipe sounds really good.
Me: (Saying) Please learn to manage your time more efficiently – you are lucky that cooking is part of my job description. (Thinking) I am so happy you can spot a great recipe worth making.
Epilogue: A double batch was prepared with a healthy dose of adaptation and improvisation. My son chopped the garnishes and washed the dishes. Everyone in the class loved the recipe, and we enjoyed it for dinner.

Cuban Inspired Braised Beef with Oranges
Serves 6-8

For the beef marinade:
3 pounds beef chuck, cut in 3 inch chunks
Salt and freshly ground black pepper
4 garlic cloves, minced
1 small onion, grated with juices
1 tablespoon olive oil
2 teaspoons ground cumin
Juice and zest of one orange

For the braise:
2 tablespoons olive oil
1 cup dry white wine
Juice of 2 oranges

Soft tortillas, warmed
Garnishes:  salsa, sliced avocado, sliced jalapeno peppers, black beans, chopped fresh cilantro, lime wedges

Marinate the beef:
Cut beef chuck in 3 inch pieces. Salt and pepper on all sides. Place in a bowl or container. Add garlic, onion, olive oil, cumin, orange juice and zest. Turn the beef to coat with marinade ingredients. Cover and refrigerate at least 3 hours or preferably overnight.

Prepare the braise:
Heat 2 tablespoons olive oil in a deep skillet or pot. Add beef in batches in one layer without overcrowding. Brown on all sides. Transfer to a plate and repeat with remaining beef. Pour wine into the pan to deglaze. Return beef. Add orange juice. Cover and simmer, occasionally basting with juices, until beef is very tender and easily falls apart, about 3 hours.
Transfer beef to a plate. Boil pan juices over medium-high heat until reduced and thickened, about 20 minutes. Add salt and freshly ground black pepper to taste. Shred beef and return to pot; keep warm.
To serve, spoon some of the beef over a warmed tortilla. Top with optional garnishes, such as salsa, fresh avocado, jalapeno peppers, black beans, cilantro and freshly squeezed lime juice.

Scandinavian Classic Baking and a recipe for Desert Sand Cookies

Scandinavian Classic Baking and a recipe for Desert Sand Cookies

When Pat Sinclair asked me if I would like a copy of her newly published cookbook, Scandinavian Classic Baking, I didn’t hesitate to accept. She reached out to me after she read an article I wrote on Danish Open Face Sandwiches for NPR – perhaps recognizing another kindred spirit when it comes to Scandinavian cuisine. Well, she got that right.

Since the book arrived, I have pored through it – that is, when I have had a chance to read it. This book has struck a nostalgic chord in our entire family, with everyone vying for a look and tagging favorite recipes. And there is something for all of us:  soft, yeasty cinnamon rolls drizzled with almond icing, cardamom scented breakfast buns, Swedish pancakes with lingonberries and ginger-spiced pepperkakor cookies – to name but a few.

This book is beautifully and thoughtfully compiled, with an authentic collection of recipes representing all of the Scandinavian countries, accompanied by lovely photographs by Joel Butkowski. The recipes in the book are clear, concise and approachable, splendidly representative of Scandinavian cuisine, which is typically unpretentious and uncomplicated. Many of the recipes are supplemented with side bars packed with informative tidbits on Scandinavian culture with tantalizing photos of landmarks and people, elevating this compact book to the cocktail table.


Swedish Apple Pie, simple and pleasing. Luckily I snapped a picture before the family devoured it.

Last weekend we ticked a couple of recipes off of our long list. Since my daughter was helping, she chose to make Desert Sand Cookies and Swedish Apple Pie. As we baked, we chatted about Denmark. We spoke of family, friends and places we look forward to visiting on our next trip.  We spoke of holidays and some of our favorite foods. I thought of the traditions that are passed down through generations through recipes, and how these recipes keep memories alive while connecting us as a family. In our well traveled family life this has been exceptionally important, as we mindfully strive to remember our roots and the different countries in which we’ve lived.  Now we have a little extra help from Scandinavian Classic Baking.

Desert Sand Cookies
adapted from Scandinavian Classic Baking by Pat Sinclair

The key to these simple butter cookies is the browning of the butter, which gives them their unique and delicious flavor, typically found in Danish Butter Cookies.

Makes 24 (1 1/2-inch) cookies

1 cup unsalted butter
2 cups all-purpose flour
1/2 teaspoon baking powder
1/2 teaspoon salt
1 cup granulated sugar
1/2 teaspoon vanilla extract

Brown the butter in a medium saucepan over medium heat, stirring occasionally. When the butter begins to foam, stir constantly until it turns a deep golden brown. Watch it carefully at this point, because the color will change quickly. Cool to room temperature.
Heat oven to 350 F. (180 C.) Whisk the flour, baking powder and salt together. Add the cooled butter and vanilla to the sugar in a medium bowl and stir until evenly mixed Add the flour and mix to form a dough. Shape the dough into 1 1/2 inch rounds. Place on baking sheet and press a crisscross pattern with a fork. (Dip the tines of the fork in a little flour if it sticks.) Bake 10-12 minutes or until set; they will not brown very much in the oven. Cool on the baking sheet for 2 minutes before removing to a wire rack to cool completely. The cookies are fragile until cool.