Cauliflower Purée

cauliflower puree tastefoodCan you ever get tired of potatoes? No, you firmly say, and I would agree. Sometimes, however, a fluffy-creamy-comforting side dish is called for, and potatoes (shocker) just don’t do the trick. Usually it’s simply a menu issue, meaning potatoes are not a perfect match to the entree. Think shellfish, for instance, such as scallops or shrimp. Or a cuisine that doesn’t traditionally include potatoes. Step in, caulflower. There’s something a little magical about this gnarly crucifer. Eaten raw, its flavor is pronounced in an earthy, grassy, unmistakably cruciferous way. When steamed, it transforms into something else, morphing into a buttery, milder version of itself – slightly sweet, a little fresh, and beautifully enhanced with, yes, butter. When roasted, it becomes something else entirely, evoking adjectives which include caramelized, nutty, crisp, and addictive. I made this puree recently to accompany a dinner of slow-cooked lamb. It goes equally well with just about anything.

Cauliflower Purée

The chicken stock adds great flavor to the purée. If you prefer a vegetarian version, substitute vegetable stock. Alternatively, you can use water, but adjust the seasoning accordingly. Makes about 2 1/2 cups.

1 large head cauliflower, florets and core cut into 1-inch pieces
2 cups chicken stock
1/3 cup finely grated Pecorino Romano cheese, loosely packed
1 garlic clove, minced
2 tablespoons unsalted butter, room temperature
1  teaspoon salt
1/4 teaspoon freshly ground black pepper, plus extra for garnish
Fresh thyme leaves

Place the cauliflower and chicken stock in a large pot. Bring the stock to a boil then reduce the heat and simmer until the cauliflower is very tender, about 20 minutes. With a slotted spoon, transfer the cauliflower to the bowl of a food processor. Add 1/4 cup of the chicken stock and process until smooth. Add the cheese, butter, garlic, salt, and pepper and process to blend. If the purée is too thick, thin with additional spoonfuls of the stock to your desired consistency. Serve garnished with fresh thyme leaves and extra black pepper.
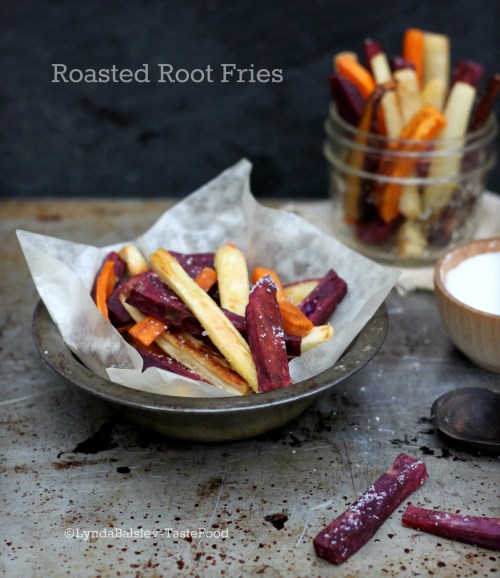
Roasted Root Vegetable Fries

root fries

If you have a hankering for fries, try these spiced and roasted root fries for a healthy alternative. Switch out the go-to potato for nutrient-rich roots and tubers, such as sweet potato, rutabaga, carrot, and turnip. Mix and match the selection to your taste, but go for a colorful array, guaranteed to brighten your dinner plate. Slow roasting them will coax out the natural sugars which will encourage browning and slight caramelization, without the added fat of deep frying. Serve with a cooling yogurt dip spiked with Sriracha – not too heavy, low in fat, big on flavor. So, go on and indulge in this healthy winter snack and consider it a virtuous start to the new year.

Roasted Root Vegetable Fries
Leave the skin on the baked potato for extra nutrients and texture. If you can get your hands on purple sweet potatoes, give them a try – they maintain their firmness during roasting which makes for a great fry.

Serves 4 to 6

2 1/2 pounds assorted root vegetables, such as sweet potato, rutabaga, carrot, parsnip
2 tablespoons olive oil
2 teaspoons salt, or to taste
1 teaspoon ground cumin
1/2 teaspoon sweet paprika
1/2 teaspoon freshly ground black pepper

Sriracha Yogurt Dipping Sauce:
1 cup Greek whole milk yogurt
1 small garlic clove, minced
1 tablespoon Sriracha
1/2 teaspoon salt
1/4 teaspoon freshly ground black pepper

Heat the oven to 425°F. Cut the root vegetables into 2-inch batons, about 3/8-inch thick. Place in a large bowl. This the oil, salt, cumin, paprika, and pepper in a small bowl. Pour over the vegetables and stir to evenly coat.

Spread the vegetables in one layer on a large rimmed baking sheet. Bake on the lowest rack of the oven until browned on the bottom, 20 to 25 minutes. Move the baking sheet to the top rack of the oven and bake until golden brown on top and tender but not limp, about 20 minutes.

While the vegetables are roasting, whisk the dipping sauce ingredients in a small bowl. Serve the fries with the sauce for dipping.

Warm Cauliflower Couscous with Lemon and Chiles

Cauliflower couscous tfCauliflower Couscous – Posted by Lynda Balslev

The secret to this gluten-free side dish is cauliflower – not as an addition to a salad of couscous grains, but as a replacement. That’s right – it’s all cauliflower, finely chopped to the size of couscous or rice grains, then tumbled with lemon, chiles and fresh herbs. Cauliflower holds its texture beautifully, either raw or, in this case, sautéed, providing a mild, nutty flavor and firm bite that will likely leave your dinner guests stymied and then pleasantly surprised.

Warm Cauliflower Couscous with Lemon and Chiles
Serves 4 to 6 as a side dish

1 medium head cauliflower, about 1 1/4 pound
2 tablespoons olive oil
1 teaspoon salt
1 garlic clove, minced
1 teaspoon ground cumin
1/2 teaspoon sweet paprika
1/4 teaspoon crushed red pepper flakes
2 thin scallions, white and green parts thinly sliced
1 jalapeño pepper, stemmed and seeded, finely chopped
1 sweet “Jimmy Nardello” pepper, seeded and thinly sliced
1/2 cup parsley leaves, chopped
1/2 cup cilantro leaves, chopped
1/4 cup mint leaves, chopped
1 teaspoon finely grated lemon zest
1/4 teaspoon freshly ground black pepper

1. Remove the leaves and core of the cauliflower. Coarsely chop the florets and place in the bowl of a food processor. Pulse until the florets are finely chopped, 10 to 12 times.
2. Heat the oil in a skillet over medium heat. Add the cauliflower and salt and sauté until beginning to soften, 2 to 3 minutes. Add the garlic, paprika, cumin, and red chili flakes, Continue to cook until the cauliflower is tender but not mushy, 3 to 4 minutes.
3. Remove from the heat and stir in the remaining ingredients. Taste for seasoning. Serve warm or at room temperature.

Golden Beet and Shiitake Farrotto

farrotto tf

Posted by Lynda Balslev

When you switch out the rice with farro in this risotto-style dish, you end up with farrotto. Like rice, the farro grains steep and simmer in stock, but without the nonstop requirement of stirring with rice. The difference is that farro has a hearty chewy texture, never succumbing to mushiness. Each nutty whole wheat grain maintains its shape, exuding earthy wholesomeness. You can’t help but feel healthy when you eat it.

Farro has an ancient pedigree, originating in the Mediterranean and the Middle East. Also known as emmer, and compared to spelt, farro is a species of wheat, high in fiber and rich in protein and B vitamins. It’s delicious in salads, pilafs, breads, soups and stews. If you haven’t tried it, you should.

Farro with Shiitake Mushrooms and Roasted Yellow Beets

Serves 4 to 6

1 tablespoon unsalted butter
2 tablespoons olive oil, divided
1 small shallot, finely chopped, about 2 tablespoons
8 ounces shiitake mushrooms, sliced 1/4-inch thick
Sea salt
1 large garlic clove, minced
1 teaspoon thyme
1 cup semi-pearled farro, rinsed and drained
1/4 cup dry white wine
2 cups chicken stock (or mushroom stock for a vegetarian version)
1 medium beet, 6 to 8 ounces, peeled and diced
2 tablespoons chopped Italian parsley, plus extra for garnish
1/2 teaspoon freshly ground black pepper
1/4 cup crumbled fresh goat cheese or feta, optional

1. Melt the butter with 1 tablespoon olive oil in a large saucepan over medium heat. Add the shallot and sauté until softened, about 2 minutes. Add the mushrooms, lightly season with salt, and cook until they begin to soften and release their juices, 3 to 4 minutes, stirring constantly. Add the garlic and thyme and sauté until fragrant, about 30 seconds. Add the farro and cook until slightly toasted, about 2 minutes, stirring constantly. Pour in the wine and stir until absorbed. Add the stock and 1/2 teaspoon salt and bring to a boil. Reduce the heat to low and cover the pot. Simmer until the farro is tender and the liquid has been absorbed, 30 to 40 minutes.
2. While the farro is cooking, heat the oven to 400°F. Toss the beets, 1 tablespoon oil, and 1/4 teaspoon salt in a bowl. Spread on a small rimmed baking sheet or baking pan and roast in the oven until the beets are tender and golden brown in spots, about 20 minutes.
3. When the farro is ready, stir in the beets, parsley, and black pepper. Serve garnished with additional parsley and crumbled fresh goat cheese, if using.

Crispy Prosciutto

Crispy Parma tastefood

Do you like crispy bacon? Then try making crispy prosciutto. Oven baking slices of prosciutto (or any other dry cured ham) transforms supple ham slices into crunchy shards ready for munching or crumbling over salads, soups, pastas and vegetables. Baking dehydrates the meat, concentrating its flavor and intensifying its saltiness while cooking off excess fat. The resulting wizened slivers of dried pork add a punch of flavor to almost anything and taste great as simple finger food. I call these salty snippets crack-croutons because they are highly addictive and intensely flavorful. 

Crispy Parma Slices Lynda Balslev

Oven baking is a great way to use up any leftover parma, coppa or prosciutto in your fridge – if you’re lucky enough to have leftovers. If not, the method is so easy and quick it justifies shopping for a whole package to open and pop into the oven. And you don’t have to spring for the expensive stuff – any thinly sliced dry cured ham will do. I often use German prosciutto from Trader Joe’s that’s half the price of the Italian equivalent. 

crispy parma cru Lynda Balslev

To crisp the ham, arrange the slices in one layer, without overlapping, on a baking sheet lined with parchment paper. Bake in a 350°F oven for 15 minutes, then turn off the heat and let the ham stay in the oven for another 10 minutes. Remove and cool, then break into shards. The crispy ham will keep in a covered container in the refrigerator for up to one week – but I promise it will be long gone by then.

Five ways to use crispy prosciutto:
1. Scatter over mixed salads.
2. Sprinkle over creamy soups and chowders.
3. Garnish eggs and frittatas.
4. Crumble the shards and use to season cooked vegetables.
4. Add to cheesy pasta dishes and homemade pizzas before serving.

Grilled Broccoli Rabe

broccoli rabe tastefood

Broccoli rabe, also known as rapini, is a brassica, or mustard plant. It resembles skinny leafy broccoli with narrow stems, spiky leaves and tiny green buds that resemble miniature broccoli heads. Slightly bitter and peppery, rapini fries up well in a skillet with robust ingredients such as garlic and red chili flakes – which is how I often prepare it. Yesterday I tried a different method and tossed the slim stems with olive oil and salt, then gave them a good char on the grill. Not only was it super easy to prepare, the charred flavor was a perfect match with the assertive rapini. I served it as an accompaniment to a whole chicken I roasted in a skillet on the grill. While the chicken rested, I cooked the rabe. Then, before serving, I drizzled a few tablespoons of the chicken pan juices over the greens. While chicken pan juices are not a necessary addition, I highly recommend it.

Grilled Broccoli Rabe

Serves 3 to 4 as a side dish.

1 pound broccoli rabe
Extra virgin olive oil
Salt
Freshly ground black pepper

Prepare the grill for direct cooking over medium-high heat. Place the broccoli rabe in a bowl. Drizzle with 1 to 2 tablespoons olive oil. Lightly season with salt. Toss to coat. Carefully place the broccoli rabe on the grill, perpendicular to the grates. Cook with the lid closed until bright green in color and charred in spots, about 4 minutes, turning once or twice with tongs. Transfer to a serving plate. Serve warm.

Black Lentil Salad with Asparagus, Kale and Egg

black lentils bowl tastefood

Black lentils are the star of this salad. These tiny pellets are nicknamed Beluga lentils since they resemble caviar. They remain firm when cooked, which makes them a great addition to salads, and their shiny blackness provides vivid contrast to colorful vegetables. Like their brown or green brethren, black lentils are a superb source of iron, fiber, protein, folate and magnesium. Plus, they are easy on the wallet. Not bad for a little legume.

black lentils salad tastefood

Black Lentil Salad with Asparagus and Egg

1 cup black lentils
6 to 8 thin asparagus
1 garlic clove, minced
2 tablespoons extra-virgin olive oil
1 1/2 teaspoons fresh lemon juice
1 1/2 teaspoons red wine vinegar
1/2 teaspoon Dijon mustard
1/2 teaspoon salt
1/4 teaspoon freshly ground black pepper, plus more for serving
2 cups coarsely chopped greens, such as spinach or arugula
2 spring onions, white and pale green parts thinly sliced
1 small red jalapeño pepper, finely chopped
1/4 cup chopped parsley
2 tablespoons chopped mint
2 hard boiled egg yolks, crumbled

1. Rinse and sift through the lentils for any small stones. Put the lentils in a large saucepan and cover with water by about 2 inches. Bring to a boil over high heat and reduce the heat to medium-low. Partially cover the pan and simmer until the lentils are tender but firm, about 25 minutes. Drain the lentils and rinse under cold water to cool. Transfer to a large bowl.

2. While the lentils are cooking, bring a wide pot of salted water to a rolling boil. Add the asparagus and blanch until they are bright green and crisp-tender, no more than 1 minute. Drain and rinse the asparagus under cold water to stop the cooking process. Cut off and reserve the tips and cut the stalks into 1/2-inch pieces.

3. Whisk the garlic, oil, vinegar, lemon juice, mustard, salt, and black pepper in a small bowl. Pour over the lentils and stir to coat. Add the asparagus tips and stalks, the greens, spring onions, jalapeño, parsley, and mint. Gently stir to combine and taste for seasoning – you might need more salt. If the salad is too dry at this point, drizzle with a little extra oil or a squeeze of lemon.

4. Transfer the salad to a platter or divide among serving plates. Alternatively, arrange over a pile of greens. Garnish with the crumbled egg yolks and black pepper and serve.

Kale Gratin

kale gratins tastefood.jpg

Winter Greens Gratin

Gratins are a great way to eat your vegetables, especially in the winter. Who can resist bubbling pots of roasted vegetables and winter greens, crispy golden on the top and cheesy-creamy in the center? Hearty earthy greens, such as kale, spinach and chard, stand up exceedingly well to rich bechamel and melted cheese (what wouldn’t?) Serve in a large gratin dish for family style dining or spoon into individual ramekins for fancy serving. Either way, you can be sure that everyone will be eating their greens.

Kale Gratin
Feel free to add other greens or vegetables, such as chopped broccoli or cauliflower. Pecorino or Gruyere cheese may be substituted for the Parmigiano. Serves 4 to 6

1 tablespoon olive oil
1 large shallot, finely chopped, about 1/2 cup
1 to 2 bunches kale (Tuscan or curly), tough ribs removed, coarsely chopped (about 10 cups)
2 tablespoons unsalted butter
2 tablespoons all-purpose flour
1 cup whole milk
1 cup heavy cream
1/2 cup finely grated Parmigiano cheese, divided
1 teaspoon salt, or to taste
1 teaspoon freshly ground black pepper
1/4 teaspoon ground nutmeg

Preheat the oven to 350°F. Heat the oil in a deep skillet or wide saucepan over medium heat. Add the shallot and saute 1 minute. Add the kale and saute until slightly wilted, about 2 minutes. Remove from heat. In a medium saucepan, melt the butter over medium heat. Add the flour and cook, stirring, until light golden, about 2 minutes. Whisk in the milk and cream. Simmer, stirring, until thickened. Whisk in 1/4 cup cheese, the salt, pepper and nutmeg until the cheese melts and the sauce is smooth. Pour over the kale and stir to combine. Transfer to a buttered gratin dish or individual ramekins. Top with the remaining cheese. Transfer to oven and bake until the tops of the gratins are golden brown and bubbly, about 25 minutes. Serve warm.

Roasted Cauliflower with Chilies, Lemon and Mint

cauliflower tastefoodEat your vegetables – Roasted Cauliflower

It’s a hunch, but I would be willing to bet that you could persuade the most ardent veggie haters to try this cauliflower recipe. Roasting cauliflower magically transforms the snow white crucifer with cabbage-y notes into a tender yet crispy, caramelized treat, coaxing out its natural sweetness and nuttiness. Simple seasonings, such as paprika, salt and pepper gently enhance the flavor. You can serve it simply like that, or go the full Monty and toss it with chilies, lemon and mint.

Roasted Cauliflower with Chilies, Lemon and Mint

Sambal Olek is a Southeast Asian chili sauce. It’s Middle Eastern cousin, Harissa, may be substituted. Serves 4.

1 large head cauliflower
2 tablespoons extra-virgin olive oil, plus more for drizzling
1 garlic clove, minced
1 teaspoon sweet paprika
1 teaspoon salt
1/2 teaspoons freshly ground black pepper
Finely grated zest from 1/2 lemon
3 tablespoons chopped fresh mint
Harissa or Sambal Olek

Preheat the oven to 400°F. Slice the cauliflower, top to bottom into 3/4-inch slices. (Slicing the cauliflower will provide flat sides which will brown easily when roasting). Cut away the thick stems, and gently break the florets apart into large bite-sized pieces. Place in a large bowl. Add the garlic, 2 tablespoons olive oil, paprika, salt and pepper. Gently toss to coat, then spread onto a rimmed baking sheet. Some of the florets will break into small pieces, but that’s ok – the little bits will get nice and brown while roasting.

Roast on the bottom rack in the oven until the cauliflower turns brown on the bottom, about 20 minutes. Transfer the pan to the top third of the oven and continue to roast until golden brown on top and tender, about 20 minutes. Transfer to a serving platter. Drizzle with extra olive oil. Drop small spoonfuls of sambal olek over the cauliflower and garnish with lemon zest and mint. Serve warm or at room temperature with extra chile sauce on the side.

Baked Root Vegetable Fries

root veg fries tastefood

You can have your fries and still feel virtuous with these colorful roots. Give the russet potato a well-deserved break, and substitute carrots, parsnips, rutabaga, or sweet potato for the ubiquitous spud. As their name implies, root veggies are the roots of growing plants, which means that they are storehouses of energy and nutrients. Not only that, they are jammed with pent up flavor and natural sugars, which translates to sweet, earthy, nuttiness on the plate.

Mix and match your favorite roots and spice to your taste. Simple salt and pepper is always a winner, or spice them up with a zesty mixture of cumin, paprika, and cayenne. And yes, you can have your dipping sauce too without tipping the scales. Try a cool and creamy Greek yogurt sauce infused with garlic and chipotle for a smoky, low fat and highly addictive sauce. Alternatively, ditch the sauce and ramp up the garlic notes with a zesty lemon, garlic and parsley gremolata.

Baked Root Vegetable Fries 
Serves 4 to 6

1 large parsnip
1 large carrot
1 medium sweet potato
1 medium rutabaga
2 tablespoons olive oil
2 teaspoons salt, or to taste
1 teaspoon freshly ground black pepper

Chipotle Sauce:
3/4 cup Greek whole milk yogurt
1 chipotle in adobo, minced
1 small garlic clove, minced
1/2 teaspoon salt
1/4 teaspoon sugar

Lemon Gremolata:
1 to 2 garlic cloves, minced
1 tablespoon finely chopped Italian parsley leaves
2 teaspoons finely grated lemon zest

1. Heat the oven to 425°F. Cut the root vegetables in 2-inch batons, about 3/8-inch thick. Place in a large bowl. Add the oil,  salt and pepper and toss to coat. Spread in one layer on a large rimmed baking sheet. Bake on the lowest rack of the oven until browned on the bottom, 20 to 25 minutes. Move the baking sheet to the top rack of the oven and bake until golden brown on top, about 20 minutes.

2. While the vegetables are roasting, whisk the chipotle sauce ingredients in a small bowl if using. Serve the fries with the sauce for dipping. Alternatively, remove the fries from the oven and toss with the gremolata ingredients.