Chipotle Braised Short Ribs

chipotle short ribs tastefood

I won’t lie: These ribs take two days to make. Now, before you click away from this page, just hear me out. I promise that if you make these ribs, you will be a very happy cook. Your family will be eternally grateful. Your guests will be impressed. And you will be rewarded with a deeply flavorful, warmly spiced, tender and rich braise. The only people who might not be pleased will be your neighbors, because they will have to live through a day of incredible aromas wafting from your kitchen window, knowing full well they are not coming to dinner.

Now if that is not enticing enough, here is some more good news: While it takes two days to make these ribs, most of the time you will have little to do in the food prep department, because the ribs will take care of themselves, braising in the oven or sitting in the refrigerator. You will  be actively involved in the beginning, when you brown the meat (a very important step which will make you feel useful), then when you reduce the sauce (which technically your stove will do for you), and then finishing the braise for serving. Your most difficult task will be…waiting. All of the time invested is for good reason: to tenderize the beef to a supple version of itself, and to infuse the meat and sauce with knock-your-socks off flavor. So go ahead and give it a try. Start on a Friday and eat it over the weekend. And feel free to double the amount so you can freeze extras for another day or have a party – it might be a good time to invite the neighbors.

Red Wine and Chipotle Braised Short Ribs

If you have the time (and patience) rub the short ribs with the spices the  night before browning to develop the flavor. The chipotles in adobo will add a nice kick of heat to the braise. Serves 4 to 6.

Dry rub:
1 tablespoon salt
1 teaspoon ground cumin
1 teaspoon sweet paprika
1 teaspoon ground coriander
1 teaspoon sugar
1/2 teaspoon freshly ground black pepper

4 pounds short ribs, cut into 3-inch pieces

3 tablespoons olive oil, divided
1 large onion, chopped
1 large carrot, chopped
4 garlic cloves, chopped
1 teaspoon ground cumin
1 teaspoon ground paprika
1 teaspoon ground coriander
1 (6-ounce) can tomato paste
1 (750 ml) bottle heavy-bodied red wine
1/4 cup chipotles in adobo, chopped with juices
1 bay leaf
2 cups beef stock (or chicken stock)
2 tablespoons balsamic vinegar
1 tablespoon light brown sugar
Salt and freshly ground black pepper

Rub the meat:
Combine the dry rub spices in a small bowl. Arrange the ribs on a rimmed baking tray. Rub the spices all over the ribs. Let stand at room temperature for 1 hour (or cover and refrigerate for up to 24 hours.) Remove from the refrigerator 30 minutes before browning.

Braise:
Preheat the oven to 300°F. Heat 2 tablespoons oil in a large Dutch oven over medium-high heat. In batches without crowding the pan, brown the ribs on all sides, about 8 minutes. (This step is very important, so take the time to do it well). Transfer to a plate or bowl and repeat with the remaining ribs.

Drain off the fat from the pot. Add 1 tablespoon oil, the onion, carrot, and garlic. Saute the vegetables over medium heat, stirring up any brown bits in the pan, until they begin to soften, about 3 minutes. Add the cumin, paprika, and coriander and cook, stirring, just until fragrant, about 30 seconds, then add the tomato paste and stir to create a nice slurry. Add the wine, chipotles, and bay leaf and return the ribs and any collected juices to the pot. Pour in the beef stock. If the ribs are not completely covered with the liquid, add more stock or wine to top off the ribs. Bring to a boil, then turn off the heat. Cover the pot and transfer to the oven and slow cook until the ribs are very tender, about 3 hours, stirring every hour or so.

Refrigerate:
Remove the pot from the oven. Uncover and let the braise cool slightly. At this point you can remove the bones and cut away any gristle from the ribs or proceed with the bones intact – it’s up to you and how you like to serve the ribs. Cover the pot and refrigerate overnight. (This step is helpful because it will allow the fat to congeal on the top of the stew, which will be easily removed before proceeding. It also allows the flavors to develop overnight.)

Reduce:
At least 1 hour before serving, remove the pot from the refrigerator and lift off the layer of fat on the surface of the stew. Gently reheat the braise over medium-low heat until the stock is liquid enough to remove the ribs. Carefully remove the ribs from the sauce and arrange in a baking dish.

Strain the sauce through a strainer, pressing down on the solids to extract as much flavor as possible, and transfer the sauce to a large saucepan. Bring to a boil and simmer until the sauce is reduced by about half and has a thickened to a rich sauce consistency, about 15 minutes. Add the vinegar and sugar and season with salt and pepper. Pour the sauce over and around the beef. The beef should not be entirely submerged; if you have extra sauce, reserve for serving. Cover the dish with foil. (The beef may be prepared up to 3 hours in advance of serving to this point. Keep refrigerated until finishing.)

Preheat the oven to 325°F. Place the short ribs in the oven and cook until thoroughly heated through, about 30 minutes. Serve with mashed root vegetables or mashed potatoes.


Cheddar and Horseradish Potato Poppers

potato poppers tastefood

I was tempted to give you a recipe for a deflated cheese soufflé for the upcoming Superbowl, but decided to rise above deflategate and make these little poppers instead. Twice baked mini-potato poppers are a great appetizer to enjoy while watching the big football game. While they are a little time consuming to make, they can easily be prepared in advance then popped into the oven at the last minute.

Cheddar and Horseradish Potato Poppers

Something tells me that crispy bacon bits would be a great extra addition to the filling…. just saying. If you agree, then consider mixing a small handful of rendered bacon bits into the potato filling, or sprinkle on top in place of the thyme.

Cheddar and Horseradish Potato Poppers

Active Time: 45 minutes
Total Time: 1 hour and 45 minutes
Makes 20 poppers

20 round small potatoes, 1 to 1 1/4-inch in diameter
1 tablespoon olive oil
Salt
1/4 cup sour cream or whole milk Greek yogurt
1/4 cup (packed) finely grated sharp Cheddar cheese
2 tablespoons unsalted butter, softened
2 tablespoons (packed) finely grated fresh horseradish
1 large garlic clove, minced
1/2 teaspoon freshly ground black pepper
1/4 cup (packed) finely grated Parmesan cheese
Fresh thyme leaves, for garnish

1. Heat the oven to 400°F.

2. Trim the potatoes: Slice a small tip off of each potato to create a flat bottom for the potatoes to stand without rolling or tilting. Slice about 1/4 off of the tops and discard the tops. Place the potatoes in a medium bowl with the oil and 1/2 teaspoon salt and toss to coat. Arrange on a parchment-lined baking sheet, top-side down. Bake until tender, about 30 minutes. Remove and cool to the touch.

3. Using a teaspoon, gently scoop out the centers of the potatoes without piercing the bottoms. Place the potato flesh, sour cream, cheddar cheese, butter, horseradish, garlic, 1 teaspoon salt, and the pepper in a bowl. Using a fork, mash until well combined. Carefully spoon the filling back into the potato shells, mounding the stuffing.

4. Arrange the potatoes, stuffed-side up, on a baking sheet. (The potatoes may be prepared up to 6 hours in advance to this point. Cover loosely with plastic wrap and refrigerate. Let stand at room temperature 30 minutes before continuing.)

5. Heat the oven to 350°F. Top each potato with a generous pinch of Parmesan cheese. Transfer to the oven and bake until the potatoes are hot and the cheese is melted, about 20 minutes. Serve warm, garnished with fresh thyme.

Healthy Holiday Appetizers: Smoked Salmon Kale Wraps

kale salmon tf

Here is a healthy gluten-free appetizer that’s perfect for holiday entertaining . I can’t get enough of these wraps, and neither can my guests. Not only are they delicious, they are pretty to look at. Crisp kale leaves are stuffed with a delicious salad of warm-smoked salmon, lemon and dill. Thanks to the sturdiness of the kale leaves, they can be assembled in advance. I recommend making an extra batch of the salmon salad, because it’s that good.

Smoked Salmon Kale Wraps
The narrowest parts of the kale leaves work best for these wraps.

Makes 24 to 30

12 ounces warm smoked salmon, flaked
1/4 cup whole milk Greek yogurt
1/4 cup fresh lemon juice
1/4 cup finely chopped red onion
1 tablespoon capers, rinsed and chopped
1/2 teaspoon Tabasco
1/2 teaspoon kosher salt, or to taste
1/2 teaspoon freshly ground black pepper
1/4 cup chopped fresh dill
1/4 cup minced chives
8 to 10 lacinato (Tuscan) kale leaves

1 lemon, halved
Fresh dill sprigs for garnish

Combine the salmon, yogurt, lemon juice, red onion, capers, and Tabasco in a bowl. Stir with a fork to blend. Add the salt and black pepper and taste for seasoning. Fold in the chopped dill and the chives.

Cut the kale leaves crosswise into 2 inch pieces. Place 2 to 3 teaspoons salmon salad in the center of the leaves and fold the leaves around the salmon, pressing gently to hold in place. Repeat with remaining kale leaves. Arrange the wraps on a serving platter. Sprinkle with lemon juice and garnish with dill sprigs.

Tomato Bruschetta

tomato bruschetta tastefood

Posted by Lynda Balslev

When I make tomato bruschetta, my family always says, “Summer food!” And so it is – especially when it’s made on the grill. Everything happens on our grill year round, I mean, during the summer. For this recipe slices of baguette get all toasty and charred on the Weber. Believe me, it’s worth the step for the flavor and saves you from the heat of the oven broiler. The grilled bread is then smothered with fresh chopped tomatoes infused with fresh basil from the garden, garlic and a glugg of olive oil. So simple, so good. If you could have summer in a mouthful, this would be it.

Tomato Bruschetta

I like the rustic presentation of halved baguette sections. Alternatively, slice the baguette on the diagonal 1/2-inch thick. Serves 4 to 6.

1 1/2 pounds vine ripened tomatoes
3 garlic cloves
2 tablespoons extra-virgin olive oil
1/2 cup basil leaves, torn in small pieces
Salt and freshly ground black pepper
1 baguette

Cut each tomato in half, and scoop out the juices and seeds with your fingers or a small spoon. Cut the tomatoes into 1/4-inch dice and place in a bowl. Add 1 minced garlic clove, the olive oil, basil, 1/2 teaspoon salt and 1/2 teaspoon black pepper. Gently stir to combine and taste for seasoning. If you don’t have super sweet tomatoes yet, a pinch of sugar may be added.

Cut the baguette crosswise into 3-inch sections. Halve each section lengthwise.
Grill the bread slices until toasted, turning once. Arrange on a platter cut-side up. Peel 2 garlic cloves and slightly crush with a knife. Rub the garlic cloves over the bread.

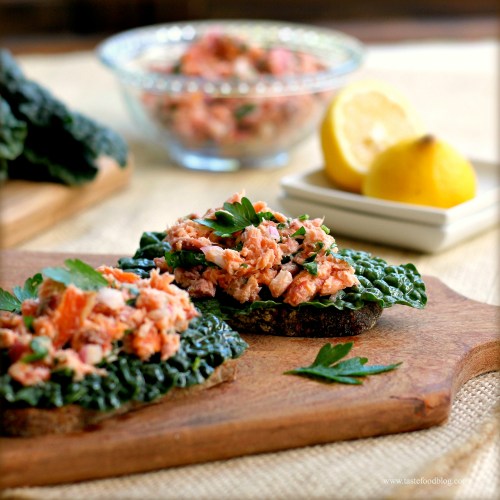
Healthy Holiday Appetizers: Warm Smoked Salmon and Kale Crostini

~ Warm Smoked Salmon, Kale, Lemon, Capers, Parsley ~

During the holiday season, it’s nice to have a few healthy appetizers up our sleeve for guilt-free nibbling before a big meal. Warm smoked salmon salad is an elegant, healthy and seriously tasty starter which can be made in advance. Spread it on crostini, scoop it with tortilla chips, or take it one step further and pile on kale leaves for a bigger heartier bite. Just be sure to make a big batch. The salmon will keep in the refrigerator for 2 to 3 days, perfect for having on hand for unexpected guests, a light lunch and late night cravings.

Warm Smoked Salmon and Kale Crostini

Depending on the event, you can serve these as bruschetta or smaller crostini. For a lighter version, skip the bread and use the kale leaves as the serving vessel. Warm smoked salmon is available in fish markets and specialty stores. To learn more about how it’s prepared, read here. Makes 10.

12 ounces warm smoked salmon, flaked
1/4 cup finely chopped red onion
1/4 cup chopped Italian parsley leaves
2 tablespoons freshly squeezed lemon juice
1 tablespoon Greek yogurt or sour cream
2 teaspoons capers, finely chopped
1 teaspoon Sriracha or hot sauce, or to taste
1/2 teaspoon freshly ground black pepper
10 baguette slices, 1/2-inch thick (or 5 slices levain bread, cut in half)
Extra-virgin olive oil
Sea salt
10 lacinato kale leaves
1/2 lemon
Snipped chives, for garnish

Combine the salmon, onion, parsley, lemon juice, yogurt, capers, hot sauce and pepper in a bowl. Mix with a fork to thoroughly combine.

Brush the bread with olive oil and lightly sprinkle with sea salt. Toast in oven until light golden on both sides. Remove and cool slightly.

Tear 2-inch tips off of the kale leaves. (Save the rest of the kale for another use). Place in a large bowl and add 2 teaspoons olive oil and a pinch of salt. Lightly massage the leaves to coat and slightly soften, about 30 seconds. Place a leaf tip on bread. Spoon salmon salad over the kale. Squeeze with half lemon and garnish with snipped chives. Serve immediately.

Roasted Butternut Squash (or Pumpkin) Soup

Butternut Squash Soup tastefoodButternut Squash, Apples, Cider, Spice 

There is something magical about roasted butternut squash. Its orange flesh softens into a sweet and nutty squidginess, which is easily transformed into a puree. It’s hard to believe something so rich and sugary can be loaded with nutrients and betacarotene, but so it is. One cup of butternut squash provides a glutton’s worth of Vitamins A, B, and C, as well as potassium, fiber and manganese. When roasted, its natural sugars are coaxed out and gently caramelized, accentuating the squash’s inherent nutty flavor – simply delicious with a pinch of salt. In this recipe, roasted butternut mingles with its fall buddies – apples, cider and loads of warm spices – yielding an essential autumn soup.

Spicy Butternut Squash (or Pumpkin) Soup

Serve as a starter to any meal, including Thanksgiving dinner. If you are entertaining a crowd, consider small servings in little cups or demi-tasse as a light hors d’oeuvre. Pumpkin may be substituted for the squash. I prefer small hokkaido pumpkins.

Serves 4 to 6 in bowls or 8 to 12 in small cups.

1 medium butternut squash (or 1 large hokkaido pumpkin) about 2 pounds
Extra-virgin olive oil
1 large onion, finely chopped
1 large Granny Smith apple, peeled, cored, cut in 1/2-inch dice
2 teaspoons curry powder
1 teaspoon ground cumin
1 teaspoon ground coriander
1/4 teaspoon cayenne, or to taste
3 cups chicken stock
1 cup apple cider
1 tablespoon light brown sugar
1 to 2 teaspoons salt, to taste
1 teaspoon freshly ground black pepper
Chopped fresh cilantro leaves for garnish

Heat the oven to 375°F. Cut the squash in half lengthwise and scoop out the seeds. Lightly brush the exposed flesh with olive oil. Place squash, cut-side-down, on a rimmed baking sheet. Bake until the flesh is fork tender, 50 to 60 minutes. Remove from oven and cool slightly. When cool enough to handle, scoop out the flesh and set aside.

Heat 1 tablespoon oil in a large pot over medium heat. Add the onions and cook until softened without coloring, 3 to 4 minutes, stirring frequently. Add the apple, curry powder, cumin, coriander and cayenne.  Cook until fragrant, about 1 minute, stirring constantly. Add the squash and chicken stock. (There should be just enough stock to cover the squash and apples. If needed, add additional stock to cover). Bring to a boil, then reduce heat, cover and simmer until the apples are very soft, about 20 minutes.

Carefully puree the soup in batches in a food processor (or with an immersion blender). Return to the pot. The soup should be thick. Thin it to your desired consistency with the apple cider. Stir in the brown sugar, salt and pepper. Warm thoroughly over medium-low heat and taste for seasoning. Serve warm, garnished with fresh cilantro leaves.

Figs and Brie

fig cheese tastefood

Figgy cheese – or would that be cheesy figs?

Simplicity combined with fresh ingredients is the essence of great summer food. There need not be a lot of fuss when produce is at it’s peak in flavor. Keep it simple so that nature’s flavors shine through. I made these figs as an appetizer the other night with a minimum of ingredients in 10 minutes. You can too.

Oven Roasted Figs and Brie with Thyme

Drizzle a little honey over the figs after they roast, if desired. These figs were so sweet and sublime I chose not to add anymore sugar. These figs are also delicious on crostini.

Makes 12

6 large ripe fresh figs, halved lengthwise
4 ounces soft rind cheese, such as brie, camembert, reblechon
Extra-virgin olive oil
Salt and freshly ground black pepper
Fresh thyme sprigs

Heat the oven broiler. Place the figs in a cast iron pan or baking dish cut-side up. Slice the cheese and cut in squares no larger than the width of the figs. Lay the slices in the center of the figs. Broil until the cheese is melted and lightly golden. Remove from the oven and drizzle with a little olive oil. Lightly season with a few pinches of salt and a grinding or two of black pepper. Garnish with fresh thyme. Serve immediately.

Shrimp and Cheese Nachos

Shrimp Cheese Nachos 1

Now, shush. I gave you lentils in my last post. Now you will get nachos. C’mon. We all need a little cheesy nacho goodness to balance out the healthy food around here. Besides, if we are going to analyze this, then this plate of fun food isn’t as bad as you think. I did my best to keep it light and fresh, just close your eyes and enjoy the cheese. And yes I called this dinner.

Shrimp Nachos

You don’t need a whole pound of shrimp for this recipe, but I do recommend it so you can pop a few in your mouth before serving.

Serves 6 (or 4 if you call this dinner)

Shrimp:
1 tablespoon extra-virgin olive oil
1 small garlic clove, minced
1/2 teaspoon ground cumin
1/4 teaspoon crushed red pepper flakes
1 pound medium shrimp, shelled and deveined

1 to 2 ripe but not mushy avocados, diced
2 tablespoons fresh lime juice
1/4 teaspoon salt
1/4 teaspoon freshly ground black pepper
Pinch of cumin

8 ounces tortilla chips
3 cups Cheddar or Monterey Jack cheese, grated, plus 1 cup for broiling
3 green onions, white and green parts separated, thinly sliced
2 jalapeno peppers, stemmed and seeded, finely chopped
1/2 small red onion, finely diced

1 large vine-ripened tomato, cored, diced
½ cup cilantro leaves, loosely packed

Heat the oil in a large skillet over medium heat. Add the garlic, cumin and red pepper flakes and stir until fragrant, about 20 seconds. Add the shrimp in one layer. Cook until pink and just cooked through, turning once, about 2 minutes. (It’s ok if the shrimp are a little under-done. They will continue to cook in the oven). Remove from pan and drain on paper towel lined plates.

Combine the avocado, lime juice, salt, pepper and cumin in a small bowl and gently stir to coat.

Preheat the oven to 375°F. Spread half of the tortilla chips in a large rimmed baking pan. Sprinkle 1 1/2 cups of the cheese, half of the white scallions, half of the jalapenos and half of the red onion over the chips. Top with remaining chips, 1 1/2 cups cheese, white scallions, jalapenos and red onion. Bake in the oven until the cheese is melted and nachos are hot, 10 to 12 minutes.  Remove the pan from the oven and turn on the broiler. Arrange the shrimp over the cheese. Sprinkle the last 1 cup cheese over the shrimp. Broil to melt the top cheese, 1 to 2 minutes. Remove the pan from the oven. Scatter the avocado, tomatoes, green scallions, and cilantro evenly over the top. Serve immediately with salsa and guacamole if desired.

Heirloom Tomato and Mozzarella Tartare with Balsamic Syrup

tomato tartare verrines tastefood

Taking its cue from Insalata Caprese, the magical trio of tomato, mozzarella and basil gets dressed up in these elegant yet simple verrines. A diced medley of colorful heirloom tomatoes is topped with creamy buffalo mozzarella and fresh basil, then laced with rich balsamic syrup. A plank of olive oil crostini completes this fresh and light dish. Make this summery appetizer when the garden is abundant with ripe tomatoes and it’s too hot to cook in the kitchen.

Heirloom Tomato and Mozzarella Tartare with Balsamic Syrup
Makes 8 servings.

Syrup:
1/2 cup balsamic syrup
1 garlic clove, lightly smashed
1 tablespoon lemon juice
Pinch of salt and freshly ground black pepper

Crostini:
8 slices of baguette, cut 4-inches in length by 1/4-inch thick
Extra-virgin olive oil
1 large garlic clove, lightly smashed

2 pounds assorted heirloom tomatoes, seeded, cut in 1/4-inch dice
2 tablespoons extra-virgin olive oil
1/2 teaspoon salt
1/4 teaspoon sugar
1/4 teaspoon freshly ground black pepper
8 ounces buffalo mozzarella
8 large basil leaves

For the syrup:
Place the vinegar, garlic, lemon juice, salt and pepper in a small saucepan. Bring to a boil and cook until syrupy in consistency and reduced by 1/3. Discard garlic clove. Transfer syrup to a bowl and cool to room temperature.

For the crostini:
Preheat oven broiler or grill. Brush baguette slices with olive oil. Rub with garlic clove and lightly sprinkle with salt. Arrange in one layer on a baking tray and broil until lightly golden on both sides, turning once. (Or grill until lightly charred on both sides). Set aside.

Place the tomatoes in a bowl. Add oil, salt, sugar and black pepper. Gently stir to combine. Taste for seasoning. Divide the tomatoes evenly between 8 glasses. Top with a spoonful of mozzarella. Drizzle with 1 to 2 teaspoons balsamic syrup.

Stack the basil leaves. Roll up the stack lengthwise and thinly slice the roll to chiffonade the basil. Sprinkle the basil over the tomatoes. Serve immediately with crostini.

Chipotle Pork Carnitas

Pork Carnitas TasteFood~ Chipotle Beer Braised Pork Carnitas ~

Carnitas are perfect weekend food. Festive and fun to eat, they are great for a casual party or a large family gathering. Begin the meat early in the day so that it will slow cook in the oven while you go about your daily business. As the meat breaks down, it will be infused by the beer and chipotle braising liquid until it’s falling apart tender at the bone. A little shredding and a final turn in the oven with the reduced sauce turns out smoky, spicy, caramelized pork, ready to pile on tortillas with salsa and guacamole. If you have any leftovers, the meat may be used in sandwiches or loaded on homemade nachos the next day.

Chipotle Beer Braised Pork Carnitas

Serves 8

2 teaspoons ground cumin
2 teaspoons paprika
2 teaspoons sugar
2 teaspoons salt
1 teaspoon freshly ground black pepper
1 (4 pound) bone-in pork shoulder
1 tablespoon extra-virgin olive oil

1 medium onion, coarsely chopped
4 garlic cloves, smashed
1 cup Mexican beer
1 cup fresh orange juice
1/4 cup chipotle chiles in adobo sauce
1/4 cup fresh lime juice
1 tablespoon brown sugar

Accompaniments:
Warm flour or corn tortillas
Guacamole
Salsa
Fresh cilantro
Sliced green onions

Heat oven to 300 F. Mix the cumin, paprika, sugar salt and pepper in a small bowl. Rub the spices all over the meat. Heat 1 tablespoon oil in a dutch oven. Brown the pork on all sides. Remove the pork. Add onion, garlic, beer, orange juice, chipotles, lime juice and brown sugar to the dutch oven. Bring to a boil, scraping up any brown bits, then reduce heat to a simmer. Return the pork to the pot. Cover and transfer to oven. Cook until pork is very tender, about 3 to 4 hours, turning every hour or so.

Remove pork from the braising liquid and transfer to a cutting board to cool slightly. When cool enough to handle, shred the meat. Place the meat in a baking dish. Strain the braising sauce into a saucepan. Boil until reduced to a sauce consistency. Drizzle over the shredded pork. Transfer the pork to oven and broil until the meat begins to caramelize, 3 to 5 minutes.

To serve, spoon some of the pork in the center of a tortilla. Top with guacamole, salsa, fresh cilantro and scallions. Roll up and eat.